I sewed!
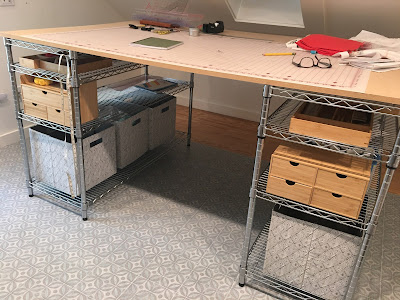
Don't get too excited...the resulting product is not as impressive as the fact that I SEWED! I have been so busy making a sewing space that I had forgotten why I was doing it in the first place. When I finally did get in there to do some actual sewing, I realized that I had done a darned swell job setting up my work space. Things were at the right height, the surfaces were big enough for their intended use, the spacing between work stations was very nice and in the right order...you might think I had done this a time or two 😉...so what did I sew?
The first thing I did was re-make...for the third time...a pair of linen pants that I bought a few years ago. The first redo was to lengthen them. The second was to rework the drawstring waist into a knit waistband.
And the third was to put the drawstring BACK on!!! (OK, I'll fess up, that I also took about 4 inches out of the circumference of the pants, which made a big different, as you can imagine. The drawstring didn't have to work nearly as hard as in the original version.) Since I had long ago discarded (or perhaps it is still lurking about in Michigan somewhere?) the first waistband and drawstring, I needed to make a new one. I used a piece of tropical print batik from my neighborhood fabric store. The light weight of the fabric was just perfect and the little bit of print for the drawstring made these old pants feel new...again!
We'll see how long this iteration lasts.
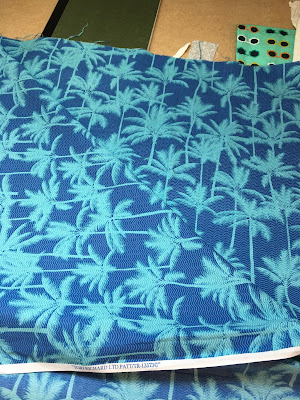
Since I was on a wide pants kick, my second project was to make a pair of PJ bottoms. I had a piece of really soft cotton lawn that looked oh so tropical. What I didn't realize until I started to lay out my pattern is the palm tree design is directional. I thought about ignoring that annoying little fact and making my pants with upright palms on the front and upended trees on the back...hey, they are PJ's, who cares? Well, I did. I knew it would drive me crazy even if I couldn't actually see it. (Is there a clinical name for that?!) So instead I made them with all the palms growing up and just let them finish where they finished. Upside down palms I couldn't handle, but cropped PJ bottoms...OK.
This next project needs a little introduction...
When we were acquiring the necessary kitchen equipment to get us started here, the need for oven mitts became one of those things that you can't believe you are spending that much time trying to figure out! We got some that looked like perfectly adequate oven mitts, but soon realized that basically we kept burning our arms and sticking the mitts into whatever hot, gooey mess we were trying to retrieve from the oven. We both wanted the "ones like we have in Michigan!!!! Waaaaaa!!!! Said mitts are simple mitten shaped affairs made out of neoprene. They keep us away from hot stuff, but are much more maneuverable than the clumsy, quilted ones we were trying to use. The hunt for neoprene mitts was on! ...and on...and on...with no luck! How hard could this be? I finally decided to get some fabric and make them. (I have a sewing room!) I found different neoprene fabrics, but had no idea from the descriptions whether they would be thick enough to do the job. I ended up opting for two neoprene lunch totes that I could cut up and make into mitts. Like I said, way too much time on my hands. But I did end up with oven mitts very much like the ones we like and they are doing a fine job, and aren't they just the cutest?!


This last project was actually done before the sewing room was ready. I had unpacked my sewing stuff to measure and figure out what size tables I would need and, well, since it was out...and since I had found a lovely rayon challis around the corner...
I made a simple dress using the Monty shirt/dress pattern from StyleArc. I made a tunic top with the same pattern using similar fabric and have been wearing it a lot. The kitchen counter worked pretty well for a cutting table although my new one is waaaaay better! The dress feels cool and easy and the colors remind me of the sea.
...I even had buttons in my "stash" that worked perfectly!
I'm starting to feel some southernmost sewjo....👍


