12.31.2016

Are We There Yet?


I am literally waiting for the plane....
I have cleaned everything I plan to clean, I have packed everything that I can fit, I have eaten anything that is left in the fridge....I'm ready already!

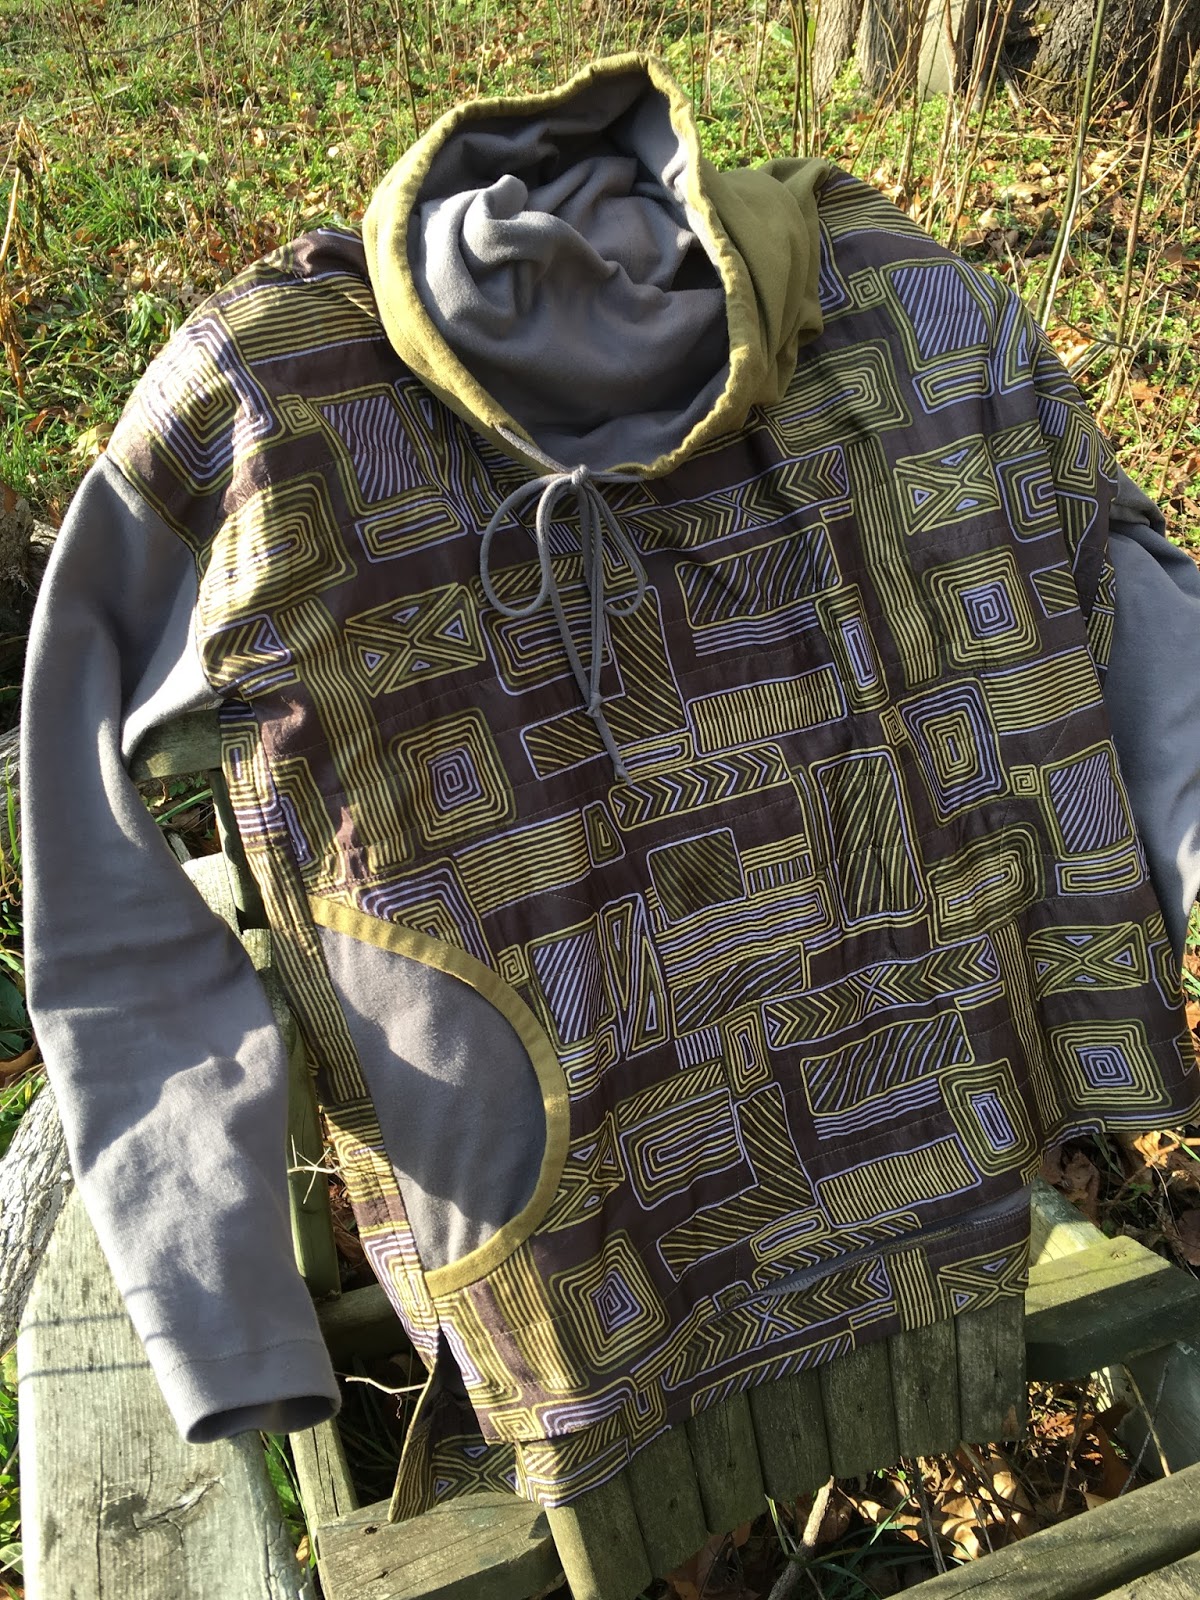
This morning I knew I would be hanging out in the house...didn't want to wrestle with the snow to go anywhere...so I wandered into my studio....I could start the vests that my son picked out while he was here for the holidays...nah, too much thinking.  I could work on a pattern that I want to do when I get back in February...nah...I'll forget whatever I do and have to redo it...I could sort something, but it's really kind of tidy right now...weird...I finally decided to finish a couple of dangling projects that have been staring at me for a long time...a really long time....

I went to a cool workshop with my Mom a while back (like I said, a long time) I hadn't even retired yet!!  My sewing guild  invited Ann Loveless (see her way cool stuff here) who has won the Grand Rapids ArtPrize twice, to give a talk and a workshop.  We learned a technique that she uses for her quilts called 'confetti piecing.'  You chop perfectly good fabric into teeny tiny little snips with a rotary cutter, arrange them on a background of batting, cover the whole business with fine mesh and stitch the heck out it.  We started with a photo that Ann's husband had taken as inspiration.

Not being much of a quilter, I wasn't sure if I would get the hang of it or like it, but yes and yes!  Still not sure when I might do more, but it was fun and a chance to play with my Mom for the day!  But like most workshop projects, it got home and sat....all it needed was a border of some kind, so I pulled it out and bordered it.


I used some black piping and green 1 inch twill tape to make the 'frame.'  It feels good to have it finished, even if I don't know what to do with it!

OK...now what?....that didn't take as long as I thought (or hoped!) so now what?

Little quilt project number two...this one hasn't been staring at me quite as long.  I went to an art quilt group last month with some of my sewing buddies.  They were doing a 'green' project.  

I hadn't realized that we were actually going to work on something during the meeting so I was woefully unprepared.  But being the exceptionally nice folks that they are, they all let me snag a few scraps and I was all set.

The challenge was to use 7 different fabrics all in shades of green and you could use one 'pop' of another color.

On my way to the meeting I almost drove off the highway watching the 'super moon' rising over the horizon in front of me.  It was spectacular!  So that is what I decided to use as my inspiration for my little quilt piece.

We used fusible stuff to attach the pieces and could stitch them later.  When I got the piece out I decided I liked it with the raw edges and carried that idea out to the border, using fusible web to make the asymmetrical folded border.


 My tribute to the super moon in shades of green!  (I kind of missed the instruction about a 'pop' of another color, but I think the yellow-green circle is kind of 'poppish.')

Little quilt two finished!
AND STILL NOT TIME TO GO!!!!!  I can't believe how long this day has been!

OK, another 'leftover' project...

Last summer I found a really cute pattern for little tiny tote thingies...not sure what to call them...it is by Lazy Girl Designs .  I had done one of their other patterns and wanted to try this one.  My son's girlfriend was having a birthday in a few days so I picked out some cute pineapple prints (she likes pineapple motifs) and hurried home to....let them sit there until now!  I figure better late than never...it's fun to get birthday presents anytime...right?


The Sweetpea pattern is very clever.  You use just one piece of zipper tape to make the closing.  The instructions show you how to wiggle the zipper pull onto the folded zipper tape.  I added the little tab to help when opening and closing it.


When you make them you start with a square and cut it diagonally and only use one side to make the 'pod.'  You also have the other side of the zipper tape!  So I used the leftover parts to make a couple of other pods, just for fun...they really are fun to make, and darn cute, too!


So that's it!  I don't even have any more UFO's to work on!  

It's not very often that my cutting table is completely empty!  Weird!

All ready for a whole slew of new projects when I get back in February!  😎

12.27.2016

Bag It!

It's official...I like making bags!  More specifically...I enjoy engineering bags!


It usually starts out as a really simple concept and then I need a pocket for this, and the front could also work for that, and if I added this thingy over here I could use it for this....and then I really get excited!!!!  I love figuring out the proportions, the ideal number of pockets, what hardware makes sense, how to do the construction....in fact I think the construction order is my favorite part.  I know, pretty geeky.  So when I realized that I would need something to cart groceries in during my stay in Key West next month, that got me going.  I will be sans auto and traveling around by bicycle so decided I would need a backpack type bag for hauling stuff.

The simple idea was a grocery sized bag with a strap that could be over the shoulder or converted to backpack straps for biking.  It would definitely need a zipper pocket for phone and wallet.  Hey....what about a sleeve-type thingy that could carry a yoga mat????  Wait a minute, if I'm going to get groceries it will certainly involve a wine bottle or two.....probably need a pocket for that! 

And then of course there is the hardware and the fabric choices to figure out.   It should be light weight but have some body to maintain the structure.  Definitely cleanable!  Plastic zippers or metal ones?  Gold or silver "D" rings? ...Isn't this GREAT?!!  The process always involves several hours in the fabric store wandering and pondering.  By the time I collect all the bits and bobs I probably could have bought 3 bags and called it good!!  Where's the fun in that?

My trial balloon was looking really good....nice pockets, good fabrics, even had a zipper in the stash that was perfect...but...the proportions were way off.  I wanted to make a 'paper bag' bottom on the bag to give it more dimension and when I got the corners sewn in it looked more like a backpack for a sausage.  Way too tall and skinny!  But I learned a lot! 

The trip to the fabric store produced two fabric combinations...I just couldn't make up my mind so I got both.  Definitely a bird theme going on... I finally decided to go full Key West and use the flamingo print, which was also a Sunbrella fabric so it would be easy to wipe off and have a bit of water resistance.


I measured my trial balloon, drew several more pictures, calculated strappage, assessed print size and placement...and slept on it.  When I turned the lights on in my studio the next morning this is what greeted me....(wine bottle strictly for measuring purposes!😏 )


I don't know exactly how long I worked on it, but it was one of those days where time was just suspended.  I love it when I get totally swept away in a project.  And all the 'engineering' paid off!  I love my new Key West backpack/grocery bag.


Front with zipper pocket and yoga mat straps.  Back with adjustable straps that convert from over the shoulder to backpack style.  The straps feed through "D" rings on the front to cinch the bag closed.

There are some pretty sweet details if I do say so myself...

Over the shoulder style.  The original idea was to have a single strap coming from the back, but the fabric is pretty soft and with just the one strap the bag collapses when it gets carried over the shoulder.  The addition of a 'fixed' strap solved that dilemna.
Backpack style.  The straps pull through keeping the bag closed when it is worn as a backpack.  Obligatory zipper pocket.  Nifty loose straps for carrying a yoga mat! (or a beach towel!)
Wine (or water) bottle pocket on the inside keeps the bottle upright and centered to make it more comfortable to carry.  The pocket is made from sport mesh with an elastic cord to cinch it closed around the bottle.  I added clips on the sides to tuck in some of the fullness .


You can see here the 'sausage' shaped trial balloon and the better proportions of the final product.  Much more useful.


My new backpack has been added to the pile of Key West bound stuff...


I can't believe it's just a week away...I am so ready for some sun and sand between my toes!


12.24.2016

Schmancy!

Snow Day!!!!!  or should I say "days!?"

These are the days that I really appreciate being retired.  I can watch the snow pile up and not worry about having to be anywhere.  And boy did it pile up!  It was the perfect excuse to hunker down in my sewing room and work on my December Artful T.

The obvious choice was a Christmas theme, but since I have been getting these done late in the month I figured it would never be ready for Christmas anyway.  I opted for a New Year's Eve 'schmancy' T.

For schmancy I went straight to the silk box.  I found a wonderful fat quarter of a jacquard woven dupioni.  Not sure when or where I got it, but it's been hanging around for awhile.  


And nothing says 'take me to a party' like velvet!  I found a piece of black stretch velvet that I think was a left over from another project, only about 3/4 of a yard...plenty!!😝
It's kind of been my thing this year to use hand sewn running stitches.  I really like the rhythm of hand stitching and it seemed perfect for a snowy December day snuggled up by the fireplace.

This time I layered the silk dupioni with a silk organza.  I really like the way the organza mutes the pattern and color of the taupe silk.  I chose a machine decorative Sulky thread in the same taupe color as the dupioni.  I thought about following the pattern of the fabric, but it seemed too obvious...and my favorite is lines and cross hatching...I doubled the thread and started stitching.


It's very subtle, but I think it is quite elegant.  It's hard to see the sheen of the thread in the pictures, but it is a nice highlight against the matte finish of the organza.


The silk stitched panel got pinned in different places on my dress form, but kept coming back to front and center!  OK....front and center it is.

The velvet has a lovely drape and worked for a dropped shoulder style sleeve.  Of course my 3/4 yard piece wasn't quite big enough to get the whole top, so a bit more scrounging around in the stash produced a black and metallic knit that blended well with the silk panel and the velvet.


As I cut the pieces I let the hems fall where the fabric ended.  It creates a 'stair-step' effect around the hem of the top which echoes the stitching of the front panel.  The extra wide ballet neckline is almost a 'cold shoulder' style, ...I used two strips of the metallic to create straps and bring the metallic of the side back to the front of the garment.  My plan was to continue the 'straps' down the back to the hem like the front, but I really liked the way they were hanging on the dress form and decided to let them stay.  They are attached at the neckline, but hang loose...finishing at the center back with a Chinese knot.


 I cut the sleeves the same as the rest of the garment pieces, just letting the hems fall where they may.  Rather than cutting them off to wrist length, I hemmed them and ran a short gathering thread in the seam at the wrist to bring them up to the right length.  They feel very decadent...


Now all I need is a date and some champagne and I'm ready to welcome in 2017!


12.20.2016

Pillow Fight

I know I said I didn't have to make a quilt for 10 more years, BUT...my Sewing Guild gang was doing a holiday gift exchange.  We all made a pillow and did a Chinese Gift Exchange.  I have no idea why it's called Chinese.  I've also heard it called White Elephant (which implies that the gifts were on their way to the thrift shop and got side tracked!  These pillows were not thrift store material I can tell you!)  Anyway, each person in turn chooses one of the wrapped gifts or one of the gifts that someone else has already opened!   You can see how it might get a bit feisty!  I wasn't sure I was going to even go home with a pillow.  Every time I opened one someone would swipe it!  I guess I just have really good taste! 😏

I actually had forgotten about the exchange and wasn't sure I would even have one done.  I was just glad that I actually had an idea pop into my head in time to do something about it.  It was too late to go to the store for supplies so I had to work from my stash.  

I ended up making two versions.  One 'trial balloon' to see if it would work and one for the exchange.  I was really please with my design. (even if it did involve a wee bit of quilting!)  I made the first go out of a white and a natural linen, something I have plenty of in my stash!  I raveled the natural linen and used the threads to embroider the snowflake.


I did the 'exchange' pillow in more traditional Christmas colors and fabrics.  I was surprised that I had these in my cupboard...not my normal palette.  It was fun.  


The back was fabric that I had planned for a sundress at one time.  I think it worked much better as the back of my holiday pillow.


I found another pillow insert and finished the 'trial balloon' for my couch!  It's a nice addition to my Christmas decorations.


While I was in a 'crafty mood' I did another fun project....several weeks ago a friend asked if I could help her hem a dress and a jacket that she planned to wear for an up coming wedding.  The dress was a cotton jersey and the jacket was a knit with a metallic finish of some sort.  While I was hunting around for pillow making supplies I came across the scraps from the hemming project.  I had planned to give them back with the garments but must have over looked them.  Now when I give them back they will be in the form of this dang cute little guy....


Hope she doesn't want the dress longer again!!!!

Happy Holidays and thank you for checking in on me.  😘

12.15.2016

Shirtwaist Extremes


I finished two shirtwaist dresses this week.  One in cozy plaid flannel and the other in crisp cool cotton broadcloth. The flannel is perfect for the cold arctic blast that we are getting here in Michigan and the cotton dress is all set for my January escape plan!  

(If this were a movie this is the part where the focus goes all soft and fuzzy and the voice-over would say "when I was a wee girl....")

The first dress I ever made was a shirt dress out of olive green kettle cloth.  It had a collar with a collar band, front button plackets, breast pockets with button flaps, cuffs, a million buttons up the front....pretty ambitious for a first dress!  My mom guided me through the whole process...cutting the pattern pieces, miles of top-stitching, button holes, set in sleeves...I was trimming the armscye seam and...disaster...I cut a biggo chunk right out of the back shoulder of the dress!  😢😢😢😢😢😢😢

It was the best thing I ever did!  

I didn't think so at the time.  At the time I was heart broken.  All my beautiful work, ruined!  It's a moment that could have soured even a veteran sewist's enthusiasm.  I give my mom all the credit for what happened next and my lifelong love affair with fabric and thread.  


In my memory, I'm a sobbing mess, but my mom is calm and collected.  She survey's the situation and hatches a brilliant plan.  She helped me cut out two tabs that had points and top stitching, we inserted one end into the sleeve seam and the pointed end stuck out onto the shoulder covering the gaping hole on one side and adding the needed 'design element' to balance the other side!  We added buttons at the points just to make sure they looked like they were part of the plan all along.  It was perfect!

I can't begin to count the lessons those little green shoulder tabs taught me that day.  About 'getting back on the horse,' 'thinking outside the box,'  'being the best mom ever,'  ' making lemonade,'  'two heads being better,'....And I thank my mom every time I sew a seam inside out, or cut two right fronts, or forget a hem allowance, or...whatever dumb thing...I think about my kettle cloth shirtwaist dress and I...

Keep Calm and Design My way out it!

So hunkering down for a couple of snowy days and top stitching collar points, and making a million button holes kind of felt like getting back to my creative roots.  And I didn't even have to cut a hole in anything to do it!

First the flannel...

When I was at OSKA in Chicago I got a great knitted vest.  I love their over-sized silhouettes  and interesting design details.  I tried the vest on with a very full flannel dress that I really liked but of course the sleeves were way too short.  I kept thinking about it and decided to make my own version.  The fabric that I found is soft and drapy and the plaid is even, bonus!!!!  Even so, with all the matching I didn't have quite enough to get all of the pieces, so the under collar, cuff facings, and hem facings are done with a contrasting cotton.  (shades of kettle cloth shoulder tabs!)  I used brass snaps and added an elastic belt across the back to control a bit of the fullness.  


It's just the ticket for the cold snowy weather we are having right now.

Next, the cotton...

I  decided to escape to Key West this coming January.  Just after making the arrangements last summer I found, what else???? Key West fabric!!!  I think it was a sign.  I went around and around trying to decide what to do with it, a camp shirt?  a skirt?  a tote bag?  shorts?  but the print was crying out to be a 1950's inspired shirtwaist dress.  It's going to be just perfect!


Cool, crisp and ready for the sunshine!  
                          But, for now, the flannel is feeling pretty comfy!


12.05.2016

Mental Health...Sewing Optional!

Everyone should have a "Therapy Group."  


This of course is my humble opinion based only on my experience, results may vary, take with a grain of salt, mileage may vary.....BUT, get yourself one!  Really!


Mine started about a decade ago as a neighborhood group of the ASG (American Sewing Guild).  We started with the purpose of sharing our adventures in clothing construction and fitting. As our vintages have been improving, we have discovered that we have to keep learning new lessons in "loving and fitting the bodies we are in now!"  

We have spent innumerable hours on 'low bust adjustments' ... 'sloping shoulders' ...  'pokey out tummies' ... 'flat derrieres' ...and the most illusive of all... 'the dreaded crotch curve!!!!!'  We have also welcomed grand-babies, down-sized, grieved the loss of friends and partners, survived illness and injury, celebrated milestones of all kinds and LAUGHED!  Really laughed, the kind of belly shaking, tear inducing, 'panty-changing' stuff that makes everything seem perfect.  This amazing group of sewing friends has been gathering pretty much monthly for more than 10 years. 


We have been celebrating the holidays for many years with a dinner outing to a local restaurant.  We eat too much, have some wine and wear our sparkly stuff.  This year we decided on a Sunday lunch.  Finding a venue proved to be more of a challenge than fitting a crotch curve...who knew!  So, I invited the group to gather at my house and I got to plan and fix a schmancy lunch for everyone!  It was really fun!

I didn't start out with a French theme, but all of my favorite recipes right now seemed to be rather French-ish.  We had Boursin and buttered radishes with Kir Royals to start, followed by Tomato Basil soup, salad and Roasted Squash galette, accompanied by Pinot Gris and finished up with almond cake and chocolate truffles. 


We squeezed all of us around my table, it was cozy, but so nice to all be together.  I made table decorations out of pattern paper, tore up cotton muslin for napkins and everyone got a pattern paper origami star to take home for their tree.  I was just cooking and crafting and smiling for days!

I can't express how deeply grounding this group has been for me.  I don't even think I want to try and figure it out...I just know that it makes sense in my life and am filled with gratitude for the friendships and love ...and a great fitting crotch curve!  XOXOXX


11.30.2016

Malaysia meets Michigan

You might think that I haven't been sewing...and you might be right!  I think we would call what happened in November being 'over-run by circumstances!'  Every time I thought I would get an afternoon here or a few minutes there to sew, something else would show up and distract me...mostly fun stuff...but not sewing stuff.  

I did have one day with my sewing buddy and we spent the WHOLE day.  We both needed it and were determined to get something done!  Of course we spent the first several hours hemming (as in not making up our minds) and hawing and popping from one idea to another.  Finally, we decided to focus on tops.  More specifically, oversized, layered tops. 

Her layers involved several rayon and sheer fabrics that she planned to overlay into the front of her top and then make knitted sleeves to help control some of the generous ease of the top design. (I will get a photo from her when she finishes to post here :)

My layers ended up being quilted together.  


I started with a very fine, billowy China silk that I got while visiting my son in Malaysia.  It is 100 degrees there all the time, so very light, tissuey silk is perfect.  But, once it got back to Michigan, where we have maybe one 90 degree day a year, it didn't seem so practical.  (kind of like when you buy the really darling muumuu on your Hawaiian vacation!)  So it sat in the stash.  The idea of "layering" gave me a whole new perspective and opportunity to take it from Malaysia to Michigan!

I tried several things and finally settled on a mid weight, stable cotton jersey. I chose to quilt random lines on the cross grain of the silk.
The two fabrics together created a very luxurious texture.  Very pliable and cozy.  


I used a pattern that was inspired by another top that I like a lot.  It's over-sized and has close fitting sleeves that keep it from looking too much like I'm wearing Santa's sweatshirt!  The quilted silk and jersey was a great fabric for the body of the top and I used the jersey on its own for the pockets, collar and sleeves.

I followed Gayle's lead on the pockets.  I loved these when I first read about them here on Gayle Ortiz' blog and am very pleased with the results on my top.


So November's Artful T is finished, again I'm just in the nick of time. (My artful T's didn't really start out as a monthly idea, but I'm kind of liking the challenge to keep me motivated to finish at least one project in a month)


Not very proficient at the 'selfie'


Attempts at "artful" photos....(not a big improvement on the selfie, but I'm digging being out in the yard on the 30th of November!!!!!!  Notice the absence of the white stuff!)

I wore my new T to pick up my new toy.   I have a great sewing machine dealer...Gall Sewing and Vac in Grand Rapids.  The only hitch is they are an hour away.  So when my machines need to visit the mother ship I make an appointment, my machines get the once over and I spend time with Becky who shows me all the schmancy stuff my machine can do.  She definitely knows what I like and always figures out cool stuff for me to play with.  The last time I took my machines in for servicing I had a chance to 'test drive' a felting machine. (Did I also mention that Becky is a GREAT sales person!!!)  After spending the morning messing around with wool and roving I ordered up one of my own.


I'm very excited to rev it up.  I know I have a bag of roving around here somewhere, I got it when I visited Fiberfest several years ago, just in case I needed it!  I'm sure there will be a "wool" artful T in my future.