Summer at the lake means a different kind of sewing.
I have a lovely sewing space at the lake house. It has a my "Mickey Mouse" sewing machine. (it's a Brother machine that has Disney embroidery motifs, which I never use, but that's why I call it my Mickey Mouse machine.) It has a serger, a great roll around folding cutting table, an ironing board that gets set up with a view of Lake Michigan...pretty great. But it doesn't have my stash or my dress form.
Sooooo, the kind of projects I do are much more 'planned.' No draping several versions of a dress, or pulling out 4 choices of linen from the linen box. When I'm at the lake I do projects that use tried and true patterns that don't need a lot of fussing or fitting. I sew home dec projects, or bags. My swim suit pattern is a perfect lake project, I don't even think I could wrestle it onto my dress form!!
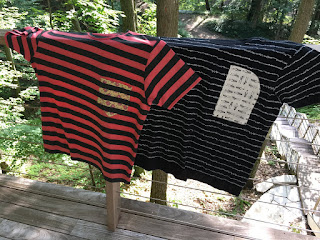
Last week I fulfilled a request from my son for some "t-shirts with crazy pockets." I used the pattern that we tweaked last year which I know he likes. One of his current jobs is managing a coffee shop. I found some fun coffee prints for the 'crazy pockets' that I thought would make good work shirts for him.
I have been doing some more reversible projects (more about those later...) and that thinking just carried over to the t-shirts. One of the fabrics was a printed knit that was plain on the reverse side. A perfect candidate for a reversible garment.
 The print on the black and white piece of fabric reminded me of the heart monitors at the hospital. The skeleton print pocket is a bit of dark humor that made me chuckle when I found it. On the reverse of that pocket is the coffee cup pocket. I turned the plain black to the print side for hems to keep one side solid black. I serged and top stitched the seams to mimic a cover stitch.
The striped T was a bit fussy! I cut out the grey stripes and sewed them over the pocket to make it look like the pocket is behind the stripes. I like the way it turned out, but a lot of matching for one pocket!!!
 He's happy with his new shirts and I had a lot of fun making them...total win win!!
 I was in my sewing room this week and thinking how I haven't been getting in there as much as I want (and need!!!!), but as I looked around, I figured that I must have been doing some sewing because there were finished projects hanging around...either I have been sewing, or I have an elf infestation!!! If it's elves I wish they would help out with the vacuuming rather than working on my projects!
One of the things I found was a skirt and top that has been marinating and happening all spring. I think I was surprised to find it finished, because it has been in stages of progress for several months.
You wouldn't think to look at it that it took much time, but there were lots of rabbit holes and U-turns as I was figuring out what I wanted to do.
It started with a pile of linen dish towels.
 I have been collecting them for a while. I always check the sale tables at kitchen stores because I don't think linen towels are popular for actual dish-doing. They are often more pricey than the cotton variety, so they end up on the sale rack...ready for a new crop of seasonal linen dish towels to show up! I'm not sure exactly where these came from and I am pretty sure that they arrived in my stash at different times, but they came out this spring with the other linen projects.
For a period this spring, every time I wandered into my sewing room my dress form was clad in a different collection of dish towels. Skirts, tops, dresses...all pinned and draped into Frankensteinish versions of clothing.
I finally decided on a fairly simple wrap skirt. I wanted to use as much of the towels as possible and I wanted to keep the hems in tact.
I sewed two towels, at a slight angle to make each layer of the wrap. The angle was determined by overlapping at the top to get my waist measurement and at the hem to get as much circumference as possible. The angle basically created a dart at the waist that curved the waistline and help fit over the hips. (oops, forgot to take a picture of that, sorry!)
I wanted the under layer to lie flat so I used a bathing suit hook to fasten it. The tie on the top layer is made from a tube of cotton jersey. The skirts sit a bit below normal waistline.

Once the skirt was finished I tried a few tops on and realized I wanted the top of the skirt to show. Since I'm not much for keeping things tucked in, I thought a cropped top would be a good option.
I found a very light, tissue weight linen jersey that I liked, but it was way too sheer in a single layer. Another trip to the fabric store for a second layer. The hems are angle from side to side for almost a 'ruffle' effect. The serged finish was a total accident. I had serged the edges before I washed the jersey and the lettuce edge just appeared when it came out of the dyer! Loved it!

 I finished the rest of the seams to the outside to match the hems.
...so lots of layers of linen! And please notice my major gardening project...my herb pots...that's pretty much the extent of my gardening these days. They are looking healthy at this point...we'll see what they look like in August!!!


 He's happy with his new shirts and I had a lot of fun making them...total win win!!


