5.31.2016

Put a Bird on It!


I've been wanting to make some artful but very wearable pieces to add to my 'retirement' wardrobe.  Now that I don't have to wear 'professional' clothes everyday I want to add a bit more fun and fancy to what I wear.  I decided I would play a bit with a wardrobe basic...the T-shirt.  I wanted to take the wearability and practicality of a T-shirt and add a bit of artfulness.

You are probably fed up with hearing about Ashland, but the inspiration for my first go at an 'artful T' came from, you guessed it...Oregon.

Random thoughts collide....(stick with me, it's just how my brain works!)

If you know the TV series Portlandia you may remember a skit where everything got better when you... 'Put a bird on it!'  The last day of our DOL retreat Diane put a bird on it...she makes these really artful birds out of bits and pieces and on our last day she had one perched on her shoulder.  She literally "put a bird on it!"


While I was in Ashland I visited Lithia Park every morning.  On one of my visits I followed this fellow and he actually parked himself so I could get this picture...


I learned that he is a Steller Jay Bird...and I would agree...he was 'stellar!'  Steller Jay Birds are very large and his bright blue color was spectacular.  I was quite taken by him.

When I got home from my week out west I had a package waiting for me.  I had ordered a new duvet cover before I left and it was waiting for me on my return.  And guess what?  Birds!  Yep, I have a duvet cover with birds on it....

I had to alter my cover to fit my duvet so I had a few inches of birds leftover.


All this bird stuff was trying to tell me something...I decided to start a design board!


I picked the blue jay looking fellow from my duvet scraps and added some linen, a piece I scavenged from Diane's scraps at the retreat (the linen leaf print, that is all I had of it to work with) a picture of a woven T-shirt....it was starting to get some legs...or maybe wings!?

I cut out the blue bird and started to arrange the front of a T-shirt....


I was smitten by Gwen's lovely hand stitched pieces.  


She puts rows and rows of overlapping stitches that create patchwork pieces reminiscent of darned garments.  I wanted to incorporate that into my T.  I started stitching....


It's hard to see in the picture, but my little jay is covered in little gray stitches!

Diane had several pieces with collars made of layers of linen and raw edges and 3D stuff...yep that had to go in there someplace....


I stitched and sculpted and stitched some more...

T-shirt front

T-shirt back


...and I am quite taken with my new "Put a Bird On It" t-shirt!  I think it is a great addition to my new retired person garb!


Go ahead...Put a Bird On It!

5.27.2016

Whatever Blows Your Skirt Up!


Sometimes the best plan is just spending the day playing together.

I had a 'play day' recently with a good sewing buddy.  It was my turn to host so we spent the day in my studio laughing and messing about with fabric!  

When she arrived she filled me in on some of the 'life' that was swirling around her and I could tell that she really needed to PLAY!  She had come with a whole bag of 'possibilities' so we pulled out patterns, tried on different garments, and finally decided on a dress that she could wear this summer and possibly to a couple of weddings that she has coming up.

We started with a really lovely bright apple green and black print linen (We think it may have come from JoAnn's several years ago!). The pattern we wanted to use was a Katherine Tilton design that called for knit fabrics.  (Already we were breaking the rules!)  We thought if the linen was cut on the bias it would give enough to work.  To make sure the top actually would fit we added some knit fabrics to the bodice, which was the closest fitting part of the dress.  Black stretch lace, a couple of striped jerseys, and a cute black and white cotton print for the hem, made up the rest of the fabrics.

I showed her the design boards that I have been experimenting with so we made one for the dress project.  They are fun to do as a way to collect thoughts for a project, but also as a record of the project when it is completed.  Here's the one we made for the green dress...


We made some changes to the pattern:

  • Because it was going to be a dress instead of a tunic the front and back hems were both cut using the hem shape of the back.  This created an even hem length rather than the hi/low look of the original pattern.
  • Using the biased linen we thought it should be cut a bit bigger around, but as it turned out, we didn't need the extra width, the linen stretched just fine.
  • We added a bias hem made of the black cotton with white swirl print for a bit of whimsy.  We chose to use bias so the hem would drape in a similar fashion to the linen.  Using a folded bias strip added some weight to the hem and made for a great finish.
It was really fun to watch it come together.  It turned out so dang cute, it fits like a dream and totally looks like my friend.  She was really pleased and having the chance to immerse herself completely in a project was just what she needed!

Sewing is so often a solitary endeavor, but when we get the chance, or make the opportunity to sew together it is such fun.  Sometimes you just need to spend time being girls together doing whatever blows your skirt up!


5.23.2016

More Gray Linen!


Who knew when I found that pearl gray tablecloth at TJMaxx that I would end up with an entire wardrobe of gray linen...I promise this is the last one...for now (I still have plenty of tablecloth to work with!  It was a monster!)


You have to look closely, but the 'skirt' on my dress form in this picture is the piece that was leftover when I cut the front of my Ashland jacket.

Here it is lying flat on my table...


I had wrapped it around my dress form just to have the color of the dress, instead of the funky color of my dress form, against the jacket as I worked.  I guess it grew on me!
The negative armhole shape started looking more and more like a pocket flap, the hem was already there from the tablecloth that it was cut from, just a couple of darts and a closure and BAM, I'd have a skirt!

...but I couldn't have just a plain, one fabric skirt, where's the fun in that!?  What to put with it?  I decided to try another Diane tip and make a 'design board.'

Diane uses foam core board and collects a grouping of fabrics, different techniques, inspirational pictures, little drawings of details, sample stitching, trims, buttons,...and at some point it might even lead to a garment or other project!  I thought it would be fun to try my hand at a design board starting with the idea of a basic wrap skirt.  (It was kind of my 'apron')


My design board!  It's not nearly as elaborate as some of the examples that I saw at DOL, but hey, it's my first go at it.  I picked some fabrics that I liked with the gray linen, some of the yarn from a sweater that I knitted that would go with the linen, maybe some rayon tape for ties, some cool clay buttons, a drapey skirt picture....I wasn't sure exactly what to do with it, but I found myself looking over at it as I worked on the skirt, it did seem to keep me on track somehow.


I started with the pocket.  The loose drapey profile made it challenging to know what to sew to what to get it to work.  I ended up with a big pleat on the inside to get the affect that I wanted.
 I added a yoke and facings instead of darts to shape the hips and waist of the skirt. 


 I decided that ties would make it feel more 'apron-esque' than hooks or buttons.  I tried light colored ties but liked the dark jersey strips better.


Like my jacket, the process seemed more like sculpting than sewing.  I really am enjoying the design-as-you-go approach.  Finishing the hem first, making a pocket without knowing what the waist will look like, serendipity is a huge part of working this way.  Being open to the details that present themselves along the way.

Here's the finished skirt with the knitted tank top.  And it all started with the 'leftovers' from my jacket.  I'm lovin' it.


5.19.2016

My Ashland Project


Starting, particularly starting with a new way of thinking, is often a daunting task.  I was really excited that our DOL mentors recognized this and gave us several "starting places."

One of our inspirations at the DOL workshop (As you may recall I went to Ashland, OR to play with Diane Ericson, et al.)  was the concept of an apron as a working garment.  It was one of the "entry points" that Diane and Holly suggested for our work during our week in Ashland.  

Another option was to start with fabric.  Not simply yardage of one fabric, but a 'collage' of different fabrics with 3D elements and textures that would suggest the direction of a garment.

A different 'way in' was to play with 'upcycling' or 'reworking' other garments.

Each person chose a starting point and it was great to have the experiences of all the 
DOL-ers to understand how each 'way in' evolved into a project.

I decided that starting with 3D fabric sounded intriguing and went about putting together a mishmash of stuff.

...when last we saw the "Ashland Project" it was most of a dress and the beginning of a vest/jacket/something......the saga continues...

It took me a while to jump back in.  I have to admit that I was a bit nervous about 'finishing' my project...by myself!  Well, it's just fabric right?  So I threw it up on the dress form and had at it!  Yikes!


Diane and Gwen had helped me decide that my collage pieces would be great for the back and the right side of a short, shrug style jacket, so that's where I started when I got home.

There was so much going on on the right side I decide to keep the left side a bit calmer by using one piece of fabric (not sure that plaid is all that 'calm!').  One of the collage pieces seemed to want to be a shawl collar so that's where I headed.

The process was more like 'sculpting' than the sewing I am used to.  I realized that when we sew with traditional patterns and fabric we start by cutting away all the parts that we don't think are part of the pattern.  As I worked on my jacket, I wasn't cutting things away until I had made a very intentional decision about what I wanted it to be...jacket part or scrap!  


As I made decisions about seam placements, closures, collars, darts the jacket began to take shape.  It was fun to be surprised by a detail that presented itself as the result of the previous decision.


One of the ideas that we explored at DOL was the difference between a garment looking 'high-end boutiquey' or 'home-made crafty'... How does raw edge construction not appear as just 'unfinished?'   What tips the scale toward 'art-garment?'  As I thought about these things at home I decided that for this garment I wanted it to be 'intentional' and have a high degree of 'finishing.'  I thought those would be the keys to it being more in the boutiquey category.  

I lined the body of the jacket, cutting the back lining on the bias to maintain the fluidness of the back fabrics.  I finished the collar to the outside with a bias strip to cover the seam.  Figuring out the sewing order to make sure I could get a professional finish was a real exercise in engineering.

'Pink' stepped forward as the accent color. I used it to stencil 'dogwood-esque' blossoms on the back shoulder reminiscent of the gorgeous dogwoods that were in bloom in Ashland.  I found myself adding other details that came from my "DOL friends in my head"....(it's kind of like hearing voices, but in a good way!) Rows of hand stitching, beads, prairie points.....


Each decision resulted in a little pile of 'bits' on my cutting table!


I was particularly surprised and pleased with the way the collar turned out.  I knew that the stripes would never chevron the way I would prefer, and when the ends (that had not been cut away!) overlapped themselves, it was the perfect solution.


Notice the 3D 'tail' that was part of the original collaged piece.
I used the sleeve pattern from Diane's Fault Lines pattern, I love them!!!!
Will be incorporating them into more garments


I am also very pleased with how the jacket works with the dress.  The dress is cut on the bias to allow 'entry' without a zipper!  Adding 3 darts for shaping at the back really emphasizes the 3D element of the jacket's back.


The dress started its life as a very large pale gray linen tablecloth!  (Great way to get a lot of fabric!) Here are some details of the dress...


The bust dart is incorporated into the neckline seam/detail.  The collar is a bias strip allowed to stand away from the body to add another 3D element.  The drawstring at the hem gives the dress a funky fun silhouette.


I also like the jacket with this top that I made before the trip to Ashland...score!  The top has a bias cut linen panel in the front with cotton jersey sides and back.  Very comfy to wear. (Yes the 'tail' of the jacket is the leftover from the top!)


You can probably tell that I spent a bit of time with this project.  The evolution and learning were amazing and I feel like I have immersed myself in a new way of thinking that I can now incorporate into my way of working and my style.  ...And I finished it in time to wear it for my ASG Spring Fashion Show!  Ba-da-Bing!


5.15.2016

Keep Calm and Carry-On!


On my last several trips I have been 'auditioning' different luggage and carry-on options.  How much do I really need?  Can I get everything in a carry-on?  If I take something out on the plane can I actually get it back into my bag?  Can I pick it up if I pack it?  Does it fit under the seat?


I like to think that I look like the chic, totally coordinated, organized traveler on the right.............................


However, I am afraid I may look more like this poor soul!


It is a conundrum.  And there are so many different options!

On my last trip I took a tote that I made last summer.  I made it with the idea of using it to take sewing and knitting projects with me in the car or for workshops.  It has tons of pockets on the outside and a big 'cargo' area on the inside.  It works really well to keep my tools and projects organized and handy when I am away from my sewing room.  Since I was on my way to a sewing retreat I packed it as my carry-on so I would have it when I got to the workshop.  Light bulb!!!

I don't know why it never occurred to me before that it would make a great carry-on, I just thought of it as my 'workshop bag.'  It was great as a carry-on!  It fit really nicely under the seat in front of me, the outside pockets made it easy to get to my water bottle and snacks, I had room for a knitting project, and my sweater (I'm always cold on planes) and it looked fun as well!

It is a pattern that I have been 'honing' for some time.  As you can see from the envelope it is an OLD pattern...it is in fact an out-of-print pattern.  (I did see a current pattern that was similar, Butterick 5867, which is designed as part of a dog accessories series!  It doesn't have the outside pocket panel, but I like the way the straps are designed!) 


                        My OLD pattern                        Current Butterick 5867 pattern

Several "Trial Balloons" of my favorite tote

I have made this tote several times.  Each time I have made slight revisions as I learn what I like and what isn't working.  My latest version involved 7different fabrics, 2 kinds of zippers, upholstery tacks, 3 different kinds of interfacing, several broken needles, two full days in the sewing room, lots of 'engineering' time, and a pound of chocolate!


Here are some of the things I have added or changed over the years as I continue working the pattern:

  • I like that the bottom is a separate piece so I can use a different fabric.  I like to use something tough and water proof. (in this case vinyl) I have also added metal "feet" to the corners to protect the bottom a bit more.  When I can't find the actual metal studs that are made for that purpose, I use decorative upholstery tacks with the ends bent over.  They are bigger than the studs I have found and come in lots of colors.

  • There are 6, count 'em, 6 pockets on the outside of the bag.  On my recent trip I realized that I don't like to keep my wallet or my phone in these pockets, even though it would be really convenient, because they are open.  So on my latest version I added a zipper to the front of one of the outside pockets.  I still have the open pocket behind the zipper pocket which is a great place for boarding passes.
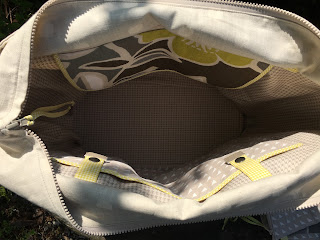
  • The tote pattern doesn't have any inside pockets.  On several versions I have added small organizing pockets for pencils, small loose 'stuff', you know, the things that usually find their way to the bottom of the bag!  On the inside of my new bag I added a zipper pocket on one side and a padded pocket on the other side to hold an ipad or laptop computer.
  • I added a small pocket on the inside of one of the outside corner pockets to keep my reading glasses or sunglasses handy.  The outside pockets just happen to be the perfect size for my favorite water bottle!
  • I padded the straps to make carrying more comfortable.  I also discovered that the length of the straps allows me to carry the bag "back-pack-style" if I get to feeling lopsided!
  • I turned the center pocket on one side into a slot that can be slipped over a roll-aboard bag for easy carrying. (My smarty pants son asked me if it fit? and I said, "of course it does!"  It was just dumb luck that when he left and I tried it on my roll-aboard that it did fit, just!  note to self, measure first!)


I am very happy with my new carry-on tote!  I will have to plan another trip very soon to try it out.  I'm sure there will be more learning and more revisions in the future, but for now I think I have created the "perfect carry-on!"