4.30.2019

The Perfect Travel Bag...Again!

I rose on Sunday morning (and let me be clear....it was April 28!!!!!) to this winter fantasyland scene.  While I certainly can appreciate the lovely, sparkly, crispness....IT'S APRIL 28!!!!  The saving grace was knowing that it would be gone by dinner time.  I decided to avoid the whole thing by hiding out in my sewing room.  

My son visited from London a few weeks ago and brought with him a wonderful duffle bag made out of waxed cotton.  It had an ingenious zipper pocket that opened the full length of the duffle and folded down when closed to create a tidy sized backpack.  

Several of my family members and friends have not just noticed, but commented on my growing fascination with bags.  (some may even have gone as far as calling it an obsession!)  Whatever...

I studied the bag, thoroughly.  It was definitely too large for a purse/backpack, but the clever opening got me thinking....

I have a pile-o-scraps left from my waxed cotton adventures last December, so I started with a pocket idea and scraps.  

My increase in traveling over the last few years has helped me hone in on what it is I like about my travel bags.  There are several 'must have' options that I wanted to incorporate into my waxed cotton backpack...

-  Yes, I do like to have a backpack.  I find if I have a one shoulder bag to haul for any extended amount of time I get all twisted to one side.  Much better to have a balanced load on both shoulders.

- Pockets!!!  Plenty!!!  There are several pockets and pocket placements that have become non-negotiable for me.   I want a phone pocket that is on the back side of the pack and opens to the side.  This allows me to swing the pack around on my shoulder and retrieve the phone quickly.  Also, pockets on the back side are more secure than front pockets.

I want a pocket for my wallet, another for my sunglasses/reading glasses, one for all the small stuff that wanders around on the bottom of a bag and is never seen again, and a place for keys to attach.  If I get many more than that I just get too confused!

When I travel I want to take things in a carry-on that I don't necessarily want to carry all the time, i.e. knitting, snacks, a sweater,  a water bottle, maybe my laptop.  BUT, most carry-on bags are too big for wandering around London for the whole day...dilemma!

My plan was to create a backpack that would accommodate my travel needs AND not be too big for a daypack.  I love a challenge!

I spent some time working out the details and running up a couple of prototypes. My plan also had to take into consideration the waxed cotton.  I had to be careful not to gang up too many pockets, linings, stabilizers, straps etc, or I would go through too many machine needles!

My pattern included pockets made from light weight slippery lining to make retrieving things easier, a fully lined big 'cavity' pocket and four zippers of varying lengths.

Just figuring out what pieces to cut out of which fabrics was crazy making!


I worked in segments and then put everything together....here are several of the pocket segments ready to go...


When it finally came together I got pretty darned excited!  (Maybe obsession isn't that far off?!)  Let me give you a tour of my new travel backpack...

Two zipper pocket on the back side...

the top pocket has inside pockets for my wallet, glasses, and keys...

the bottom pocket, with requisite side zip, is just the perfect size for my cell phone.


There is another pocket in the front flap that can hold the little stuff, lip gloss, breath mints, nail file...

So that takes care of the 'walking-around-everyday' stuff.  Now for the extra 'what-I-want-on-the-plane' stuff.
 
Here's where my son's duffle bag comes into the picture...


Voila!  Under the front flap/pocket is the biggo cavity that flattens out when nothing is inside it, or can grow to accommodate lots of plane snacks or London shopping finds as needed!


To keep it tidy there is a buckle that can be cinched down depending on the load.
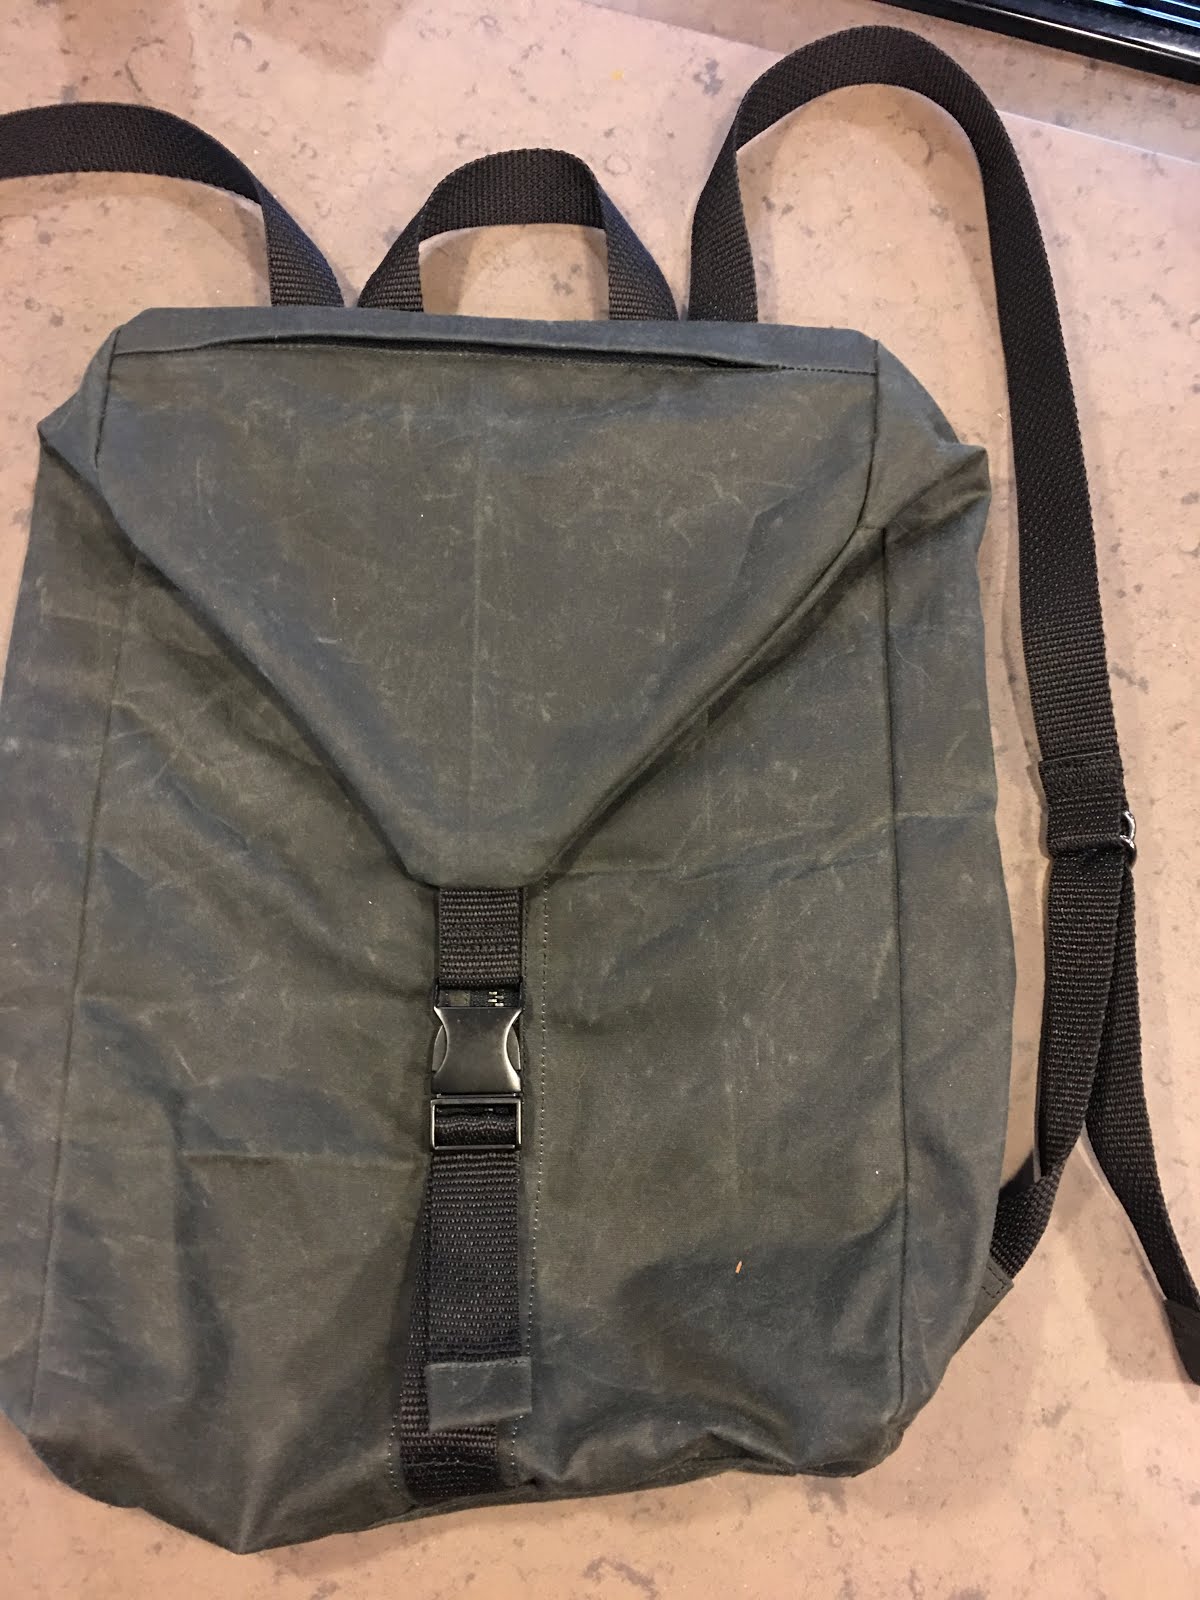

And you might think that so many wonderful features had to come in a monster size...but...It all fits in a neat, perfectly sized package!  AND, don't you think a waxed canvas backpack with black metal buckles is totally cool and hipster for an old lady?!  Please excuse my exuberance...I just get so carried away!


By dinnertime the snow was history and I had yet another 'perfect travel bag.'  I think I'll go buy a plane ticket!
 

4.19.2019

Not Quite Spring Shirts

Well, spring is taking it's sweet time this year!  I am really (REALLY) ready for a bit of sunny weather.  It's been a long, grey stretch and my SAD is kicking in big time!  I have a bunch of pretty linen on my cutting table but it just hasn't felt right yet to cut into it.  I'm still wanting soft, cozy sweat-shirty things.  So that's what I have been making.

I saw a shirt, on a recent shopping trip to Chicago, that had some interesting design features...the shoulder seam was pitched forward kind of wrapping the shoulder from the neck to the sleeve seam and the back side seam also wrapped to the front.  The back had a graceful set of seams that ended up flaring the back hem a bit over the hips and the sleeve seam met in two places on the underside, preventing a bunch of intersecting seams in the armpit.  (Yes, I did spend some quality time in the fitting room with said shirt!) 

On the same Chicago venture, I had picked up a really soft remanent at Vogue Fabrics.  It is a double-faced cotton jersey, grey on one side, off white on the reverse and super soft!  I also had a grey athletic type knit that I decided to use for my 'trial balloon' of the somewhat whacky pattern.

You can see the crazy shapes...the center front is the left hand piece and the other piece is the side back pattern piece.  Check out the length of the front armhole seam vs. the back arm hole seam! 


The other feature that I added (not part of the original shirt) is a thumb hole at the sleeve hem.  I never get to use them on shirts that I buy, because they end up somewhere between my wrist and my elbow, not conveniently located for my thumb.  If that wasn't enough, I decided that because the fabric was reversible, the shirt surely had to reverse as well.  This definitely required a trial balloon before launching in.

I hit the jackpot!  I made the first go with the athletic knit and it turned out great!  So I dove right into the second shirt while I still remembered what I had done on the first one.  I can't decide which is my favorite.  But I have been wearing them non stop because they are soooo comfortable and perfect for this end of winter almost spring season.  The crazy seaming and wrapping really works for my broad shoulders and upper back and the forward side seam hugs the hem in around my hips ever so gently.  I may end up with a whole wardrobe of these sweatshirts!  (I already have 2...no 3!)

Some details...

On the first shirt I used a darker grey rib knit to make the thumb hole, the neckband and the center back detail.  This one has a basic crew type neckline.  You can see the back neck detail and the dropped sleeve and forward twisting shoulder seam....(and the little bit of green that has given me hope that spring will actually spring!)  


For the reversible version I chose a v-neckline.  I made the white side solid white and reversed the hems and bands for the grey side.  The thumb hole was a bit of a head scratcher, but turned out in the end.


I knocked the front corner off the sleeve and added a seam allowance...I cut the 'corner' piece double with a fold that finished the thumb hole.


It was a bit tricky to make sure I had the colors that I wanted on the correct sides of the shirt!


I used my serger with off white thread to sew the seams on the grey side and then stitched them in place so they looked like a flat-felled seam on the white side.

The finished shirt is so soft and will actually be a great weight for a summer evening cover!  


....I wonder how a linen version would work...😏....hmmmmmm....


4.04.2019

Pampered Pups!


Happy Christmas, Gizmo!

You may remember back in December I was a busy little elf puttering away on coats for my whole crowd...including my son's little rescue pal, Gizmo! (you can check it out here)  

Coat update!  I figured that Gizmo might wear her little red riding coat a few times when the temperature in Michigan plummeted to well below zero, but, as it turns out, she loves her little coat!  My son says that it works kind of like the Thunder vests that some dogs like to wear during storms.  The theory is that it acts like a 'hug' and makes them feel more secure so they are calmer.  Apparently, the coat works the same way for Gizmo.  She wears it all the time!!  Who knew!!?  

I did have a request for more details about making the coats and Gizmo's big brother, Paco, is quite jealous of the little red coat (that would be me anthropomorphizing a bit!) and just happens to have a birthday coming up!  So, big dog coat for Paco coming up!

Paco is a large, black dog...there is some Great Dane in his lineage somewhere.  I thought about getting an old leather jacket and making kind of a riff on a motorcycle gang coat, but the washability of a leather dog coat seemed marginal, so I settled on a $3 fleece vest at Goodwill with a broken zipper!


I had my son take some critical measurements...around Paco's neck, around his chest, from his neck to his tail down his back, and a very important one, from his neck to his 🙈on his tummy side. (can't have the coat interfering with any business!) 

Starting with an already made garment makes it incredibly easy to make one of these coats and it is so goofy to have the collars and the pockets on a dog coat!!  

The pattern is basically an opening for the neck, a cover for the back and a tummy cover with a strap to adjust the fit.  The measurements determine how far from the collar of the garment to cut off for the back and the front, how long to make the straps and how much room to leave at the neck opening.  The pattern is really just a 'suggestion' and varies with the particular garment that is being 'remodeled.'  Here's what I started with for the fleece coat...the right side of the picture is the tummy and strap side and the left side is the part that covers the back of the pup.  The bottom of the picture is the center front/back of the pattern and lines up with the center front/back of the starting garment, and the half circle cut out lines up with the collar/neckline.


Because I was starting with a vest I didn't even have to remove any sleeves, just cut up the side seams.  I lined up the 'neck opening' with the collar of the vest and cut away what I didn't need.  


I adjusted my 'pattern' to take advantage of the already bound armholes of the vest...bonus!  I did have to sew the zipper closed up to the neck since I cheaped out and got a broken vest!

I turned the cut edges and added the straps and, Bob's your uncle, I had another goofy dog coat ready to wear!


You have to imagine my dress form on all fours...with a tail! (It actually looked kind of cute!)  I have to say that making dog coats is a new one for me, and they just make me smile while I'm making them!  Do we call that "barking mad?"!

I haven't gotten a picture of the coat on Paco, but as soon as I get him to model I will update with a photo.  


3.26.2019

The Hills are Alive!


I can't figure it out....every year when this starts to happen in my garden I end up making some unexplainable springtime confection that usually involves too many colors (as one of my sewing buds pointed out!!!) maybe some gathering and often a bow or two!!! Yikes!  Maybe I still haven't gotten over the annual "Easter Sunday dress" shopping excursion.  (complete with matching shoes, hat and gloves!) .  Whatever it is, it happened again last Saturday!  I spent the whole day blissfully patterning and puttering away and sure enough...the 'too-cute-for-its-own-good' creation appeared on my dress form.  😳

This year the devilish delight took the form of an apron dress!  As pointed out by said sewing bud, "it isn't as 'colorful' as previous spring frocks."  I think I will call that progress!  

I have been rather fascinated for the last little while with 'working garments.'  The patterns that I have been studying from Merchant and Mills are the prime example.  They take their cues from factory uniforms or denim basics and I love the usefulness and simple elegance of the garments.  I have been saving apron and pinafore pictures on a Pinterest board for a while now and decided the time was right.  


I also had a length of soft rumpled linen drapery fabric (think Sound of Music children on an alp!) that has been looking for a project.  


Recently, linen has been popular again for upholstery and draperies.  Yay, for the linen loving sewists!  I have been finding really nice linens and linen/cotton blends lurking in the home dec departments.  I am always careful to check and make sure that the contents of the fabrics are actually linen and/or cotton, and not an unpronounceable combination of chemicals.    I usually wash them several times to soften them up and get that nice rumpled affect that I associate with comfortable linen clothes.  This particular piece was on a remnant table so I am not totally convinced that it is 100% linen, but after a few rounds in the washer and dryer it was very soft and acceptable!

As I started the project it became clear that the pockets were taking the lead!  When I figured this out I realized that the fact that I was working with a minimum of pattern repeats would not be a problem.  Sticking pockets everywhere was going to cover up any attempt at pattern matching anyway, so I just cut right in, throwing matching to the wind.

Here's the finished too-cute-for-its-own-good apron....


I did find a greenish T shirt that looks OK, but maybe a bit too matchy-matchy?????  I kind of like the ivory top with it....


All the pockets were applied to the outside as patch-type pockets and I had fun figuring out the back strap connection.  I wanted it to be adjustable.  ...I guess there are a couple of 'bow-ish' details!😏

Welcome Spring!  I am ready to go, ...as soon as I learn how to yodel!!!  Do, re, mi!!!!


3.10.2019

Waiting for Spring

Tweedy shirt update...


If you have seen Rhonda's latest blog post, you now understand why we needed to postpone our sew together plan.  When she told me that she had fallen...twice...and broken things...important things like wrists... 😳 I told her to concentrate on healing, we can sew and share when she is ready.  Stay tuned!  Best wishes for a speedy recovery!

Back in my sewing room...I have been loving my cozy sweatshirt.  It has been cold and dreary here and things to cuddle up in have been my favorite way to combat the end of winter weather.  And making another version was the perfect antidote for 'dreary' cabin fever.  This time I chose a lovely cotton matelasse that I found in the upholstery department. 


The original plan was to make a little skirt.  I had been seeing short, wool or quilted skirts worn over leggings that I thought would be a cute, and warmer, alternative to yoga pants.  (I know it is OK to wear yoga pants as 'real' clothes...I just haven't gotten there yet.)  I pulled out the fabric and decided it was a bit light (in color) for the skirt plan but would feel wonderful as a sweatshirt!

As I do with most of the upholstery fabrics that turn into garments, I washed the heck out of it!  Upholstery fabrics often have more sizing than other fabrics which means they can change significantly in the wash.  I always want to know what's going to happen before I spend the time making them into garments!  I'll run some fabrics through the wash several times to get to a texture that I like. (and sometimes one washing sends them to the scarp pile!) Because this was 100% cotton the only thing that happened was that it got softer!!!!!  Ahhhhhh!

Matelasse is basically two fabrics that are held together by the "quilted" design. 

Matelassé (French: [matlase]) is a weaving or stitching technique yielding a pattern that appears quilted or padded.  Matelassé may be achieved by hand, on a jacquard loom, or a quilting machine. It is meant to mimic the style of hand-stitched quilts made in Marseilles, France.

Because of it's structure, when it is cut, the areas that are not held together by the quilting pattern, tend to fray easily.  Upholstery fabrics also fray when cut...so as soon as possible after cutting my pattern pieces, I ran the cut edges through my serger.  I cut off 1/8 of an inch with the serger and adjusted my seam allowances appropriately.


I also got a new foot for my sewing machine that was the perfect thing for this project!  I like using my walking foot most of the time and when I picked up my sewing machines from the dealer in February I noticed that I could get an edge foot for my walking foot!  Oh yeah! I'm in love! 😍
(I know, way too sewing geeky!)


I pressed open the seam allowances and used my new fancy foot to top stitch on either side of the seam.  It added a bit of detail to an otherwise pretty plain shirt!


If you are a keen observer, you will notice that on my serged pieces there are no center front or back seams, but on the final shirt there are seams! (pictures of the finished shirt ahead!)  The center back and front were both cut on the fold.  Now you might think that some one who has been sewing for herself for as long as I have and has made as many 'boxy sweatshirt' shapes as I have might know what size to cut....and you might be wrong.  I guess I thought that the heavier fabric would need more room?  I don't know...?   When I got the shoulder seams sewn it was pretty obvious that this shirt was meant for a much bigger body, and that just taking wider side seams was not going to be enough.   I took a full 3 inches out of the center front and another 2 inches out of the center back!!!!  Once I made the adjustments, which required a new seam at both centers, I really liked both the fit and the new design lines!  Bonus!


The hem is higher in the front and drops down in the back.  I ended up running a loose elastic through the hem to bring it in a bit.  The heavy fabric made it a bit "sticky-outy." (that's a technical term!)  

I feel like I am channeling Audrey Hepburn in a skiing movie!  Might need to get me some schmancy sun glasses!  (and wine!)

Note:  I was asked about the pattern for this top....
I started with a really old Vogue tunic pattern because it had a really dropped shoulder line, from there I adapted the shape that I wanted.  You could start with any generously cut top pattern.  A funnel neckline is fairly easy to draft.  I wanted to have it "cut on" rather than a separate collar piece.  I decided (rather arbitrarily) that it should stand up about 2" from the shoulder/neck point.  Because the fabric had no stretch, the opening at the neck would need to accommodate my head.  I took my head circumference (22") divided in half for the front and back and added 1/2" seam allowances.  That gave me the measurement (12") for the top neck openings.  Finally I used my french curve to gracefully connect the top of the neck to the shoulder.

I drew a little picture that may or may not help!