10.31.2016

Bleacher Butt Knitting and Beyond


I learned to knit when I was a kid, but knitting patterns are not made in my size.  I would follow the directions and spend exorbitant amounts of time knitting and blocking and end up with a too short, too wide mess!  I didn't know how to alter a knitting pattern so I lost interest in the whole thing and spent my creative time sewing.  

It wasn't until I wanted something to keep me entertained while I was attending my sons' sporting events that I picked up knitting again.  I was spending 3 to 4 hours several times a week sitting in the bleachers, mostly waiting for the next event, and figured I could probably knit sweaters for the whole team in that amount of time!!  

I realized that I needed to knit things that did not require counting and that I could pick up and put down easily so I could jump up and cheer as needed.  Basically I knitted squares.  I got quite proficient at turning squares into garments.   One square for the front, one for the back and a couple of rectangles for sleeves...voila...sweater!


I have gradually moved from 'bleacher butt' knitting to more nuanced knitting and have figured out how to use a gauge swatch and my flat sewing patterns to make shaped pieces that actually fit me when I get them together.  

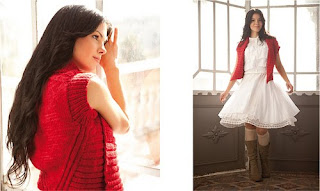
So when I fell in love with a vest in my local knitting shop I was a bit nervous about using an actual knitting pattern again.  But I figured what the heck, it's a vest...no sleeves, it didn't even have buttons!  I threw caution and years of experience to the wind and bought the book, bought the yarn and dove in!


I made it exactly as the pattern directed except for the armholes...the pattern called for about 2 inches of 1X1 ribbing around the armholes, it pulled the opening in too much and stuck out funny on my shoulders, so my knitting buddy suggested an I-cord edging.  Thank goodness for You Tube!  I like the end result much better.

It was really the back of the vest that I fell in love with.  I really like the way it hugs into the waist.  The pattern is called Malabrigo Twist Vest from Malabrigo's Book 3.  The yarn (Malabrigo Twist) is just the softest, most scrumptious stuff!  


You can see the I-cord edging at the armhole...I like it much better than the 1X1 ribbing that the pattern suggested, and it was fun and easy to do.

(I made the necklace several years ago and the beads are just right with the yarn.)

The fronts of the vest wrap around to the back and continue up over the shoulders to form the shawl collar.

I'm so pleased with my vest that I might even try another knitting pattern!!!  Woohoo!


10.26.2016

Piles of Potential

The weather has taken a definite turn toward fall.  We have had a long transition from summer to fall this year that has been glorious.  The colors are a bit late so it makes it feel much earlier in the fall than the date suggests, but it's feeling very autumnal now.


My herbs came in this week...or as my husband refers to them..."the sacrificial plants."  I have a terrible time keeping herbs going inside.  You can see how lovely they are right now and I always have high hopes of snipping freshness all winter...I guess unlike hope my herbs do not 'spring eternal!'

After finishing my marathon 'spotted' dress I felt a little lost.  It has been my go to project for so long.  I haven't had to think up anything else, it has been 'time to cut the spots' all summer.  

So...I got out two new tops that I found for fall...an amazingly soft alpaca cardigan that I couldn't resist in Peruvian Connection, and a Free People knit top that has a chunky zipper up the back...too fun.  Both were purchased with nothing to go with them, the perfect challenge.

I started pulling from my boxes and inspiration started to stir.  It's crazy how just being in the presence of fabric gets my juices going.  It's my happy place.


Here's the pile!  (the two new tops are in the lower corners, alpaca left and Free People right)  Some of my all time favorites hit the pile this time.  The lower center is a gorgeous, fine gauge wool that was collected on one of my first pilgrimages to Britex, the paisley was a recent find at Mood Fabrics, the rust piece is an Ibex wool jersey mill end from Fabrications.  Plenty of inspiration here!

As the fabrics began to speak to me I started sifting through pictures that I collect and patterns...


Here's that pile!  I've been seeing lots of jumper-like tops and dresses this year and they work well for my now retired lifestyle...the alpaca cardigan is cropped so perfect for layering with longer t's...I have been thinking about a more relaxed type of pant, rather than the more tailored styles I wore to work...I want to incorporate more 'slow sew' projects....

My eyes are always bigger than my sewing time...but this exercise always jump starts at least a few projects.  Many of these will reappear in later piles for other projects,but that's the fun...they always have 'potential!'


10.19.2016

HeTerminado!

I have been doing plenty of fun stuff, but not much of it has been in my sewing room!  BUT, I did finally finish a project that I started last spring!!!!!  Yeah!!!!

Truth be told, I started, at least imagining, this project when I visited Natalie Chanin's factory and studio almost two years ago.  I picked out the fabrics and had a basic idea of the garment I wanted to make....but if anyone has taken on an Alabama Chanin-esque project, you know what a commitment they are.  After finishing my workshop project (yes I did in fact complete what I started in Florence) I just didn't have the energy to jump right into another one!
Natalie Chanin and me sitting on a couch made from baled up t-shirt fabrics


I decided this spring that a hand sewing project would be great to take to the beach, so I got out the fabric, committed to a pattern and started stitching.  


The fabrics are a gray and greeny brown light weight cotton jersey that I got from my factory trip.  I chose the princess seam tank dress, knee length, from the Alabama Studio patterns book, an all-over circle design stencil and a gray variegated embroidery floss for the miles of stitching...


Samples of possible stitching patterns...I picked the brown on top revealing the gray in the cutouts.


At the Factory the stencil patterns are painted on the top fabric with an airbrush...in my studio, I cut a stencil out of a sheet of plastic and penciled the circles onto the fabric.  I started at the hem with lots of circles and gradually decreased the number toward the neckline.

Each piece of the garment is stenciled and stitched and cut before assembling the final garment.  (although, in this case, I chose to do the cutouts after assembling the garment...I wanted to know that it fit before I cut out all those circles!!)


The variegated thread adds movement to the stitching pattern.
Not only are the circles stitched by hand, but all the garment construction is by hand as well.

At some point around September, I realized that this had gone on long enough and I needed to infuse some urgency if I was ever going to wear this thing!  My niece's wedding in October was just the deadline I was looking for.

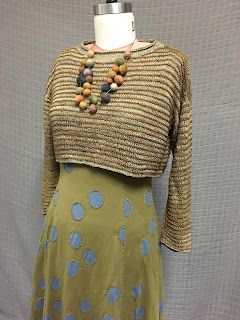
AND, just to add a bit more of a challenge, I decided that since it was going to be an evening wedding in the mountains of Mexico, I would probably need a sweater, so I added knitting a sweater to the timeline.


I had a really fun fingering weight yarn in my stash that came with a whole bunch of little felted balls strung onto it.  Of course I didn't have enough for an entire sweater (or an entire anything for that matter) so I added a soft wool worsted weight and made stripes.  The light weight stripes are looser and give a 'lace' affect and the heavier yarn gives the sweater structure.  


I was planning to add the little felt balls at the hem or the neckline, but better judgement prevailed and I used them to make a necklace instead.  

The pattern is a simple box shape, cropped just above the waist with 3/4 length sleeves.


I finished the outfit just in time to pack it...I didn't even do a final try-on!

This pile of greeny brown circles was still on my cutting table when I got home from the wedding!
It was a really wonderful affair, complete with a tequila burro parade through town.  Apparently, in San Miguel de Allende it is traditional to strap barrels of tequila to a donkey and wander the streets toasting the happy couple...who am I to argue with tradition!


 Finishing my dress and sweater was a whirlwind, and the wedding weekend was even more of a blur...although that might have something to do with the tequila!  It was super fun and my dress was comfy and terminado!


Cheers to the happy couple!!

10.01.2016

Hippies in Suburbia


September's Artful -T...
Novi, Michigan...where the American Sewing Expo is held...grew up in hardcore suburban development days!  Crisscrossed by major freeways, back to back malls with PARKING LOTS (emphasis on 'lots'), no sidewalks, and plenty of chain restaurants.  So where do you go to eat in Novi?  The mall of course!  

What does this have to do with this month's artful-T project?


Well...while trying to find the 'California Pizza Kitchen' I wandered through Nordstrom's and came across a display of 'Free People' garments.  I was intrigued by the monster cuffs on the thermal henley shirts.  A quick search with Mr. Google informed me that they call them "Hippie Cuffs."  

Having gibbon arms they of course were 3/4 length sleeves for me, which totally spoiled the affect!

Now you see how suburban development and my September T-shirt project go together...kinda...?


No luck finding thermal fabric, but an XXL shirt from the men's department at Kohl's had plenty of fabric to work with! (and set me back $6.50!!)


Now for the fun part....


I completely dismantled the henley and reconfigured it into a 'my-size' henley


I used snaps for the closure at the neck opening since putting button holes in a 5/8 inch knit placket sounded completely awful!  I stabilized the opening with a piece of ribbon...

...And the "hippie cuffs."  I'm pretty sure that no self-respecting hippie would spend the kind of time I did on *^$###!! cuffs!  I'm also confident that there is a much better way to do this than I did, but there they are...meh...kind of boring!   They didn't wow me...sleep on it....


They needed to be more hippie-like.  And what's more hippie-like then embroidery!  In this case, couching!  Much better!


My September T is a bridge between summer's linens (natural linen ribbon and linen print peaking out of the cuff) and fall's thermal knits! ....and finished on September 30th!!!