7.15.2020

A Little Wander Down Memory Lane

My husband and I have never been "collectors."  (as long as you don't count fabric....but really that's "inventory" amiright?)  We don't have shelves full of souvenirs or memorabilia.  We designed our house 25 years ago intentionally with a minimum of storage space so we wouldn't be tempted to keep things that had out lived their usefulness.  And on the whole, it has worked.  (Can you hear the "but?")  BUT....even with our draconian approach to 'stuff' we still have managed to accumulate way too much of it!  Like many of you I'm sure, we have been wandering through our cupboards and storage bins and coming across interesting things.  Sometimes I remember why something made the cut to become 'precious' and other times....to be blunt about it... I don't know why some of it is still around!  As we think about consolidating into smaller spaces, I know I will need to make some decisions about what makes the trip to the new storage areas and what ends up in someone else's basement!  Some of the choices are easy, "what the heck is this and why is it the closet"  and some are more difficult, "awww, this was our son's favorite stuffed elephant."

Note annoying mouse hole....

One of the things that turned up in my rummaging was a tablecloth.  A gigantic tablecloth.  It arrived at some point when my husband was moving things from his childhood home in Wales to our home in Chicago.  It had been a wedding gift to his parents in 1951 and I'm not sure they ever had a table big enough to hold it!  The thing measured 100 inches square!!!!  It was a monster.  At some point during it's residence in my cupboard (I think it was when my boxes were being stored in the garage in California) a little mouse nibbled on the center lace motif.  Of course it was folded neatly so the mouse was able to get all four corners with one chew!  I am quite sure I swore and cried when I realized that it had been damaged during my watch.  It went back in it's box, this time with cedar chips, until I unearthed it a few weeks ago.  I realized that there was never going to be a table large enough in my house for the tablecloth, and it looked a lot like gorgeous linen fabric to me!

The last time my sister-in-law visited from Italy she asked if I could copy a dress that she really loved.  It was a straight forward loose fitting dress and she was very happy with the new one that I made.  I pulled out the pattern, knowing that she loves it and that it fits, and started moving it around the on the tablecloth/fabric to see how to get around the mouse holes and how to take advantage of the amazing embroidery and lace motifs.  I wasn't sure I could actually cut it up, but the mouse had already made a start for me, so I chopped away.

I placed the hem on the lovely worked edge of the cloth and the lace inset landed perfectly across the back and chest of the dress.  I matched up the sleeves so the lace danced all the way around the shoulders.  I gathered the sleeve hems into a 3/4 length cuff and bound the neck.  I am so pleased with how it turned out.  In fact I liked it so much I started laying out the pattern again to see if I could manage a dress for me too!


I think my sister-in-law will really like the dress and that it was once her Mom's tablecloth...awwww!

There wasn't enough lace real estate left that was not chewed so I focused on the embroidered corner pieces for my dress.  It took a bit of fussy cutting but I managed to get a pleasing arrangement.

I had a lot of trouble figuring out what to do with the neckline.   For me, it felt to high and the raglan seams made my shoulders look like I should try out for the Green Bay Packers!  


I thought maybe adding some of the lace would open it up...


Nope, it just competed with the embroidery...

I tried a lace yoke that I had scavenged from another top...talk about your line-backer look!


...Maybe an interesting collar?   ...Maybe, but not that one!


...OK, now we're getting somewhere...


Once I opened up the neckline, I really like the second version, almost as much as the first!


Did I mention that this was a gigantic tablecloth?  I couldn't let those other lovely corners go to waste.


After hauling that tablecloth across the ocean and back and forth from one side of the continent to the other and storing it in four different basements, it is finally covering something...or should I say, somebody.  I never knew my mother-in-law, she passed away before I met my husband, but he says she would like the dresses and the top and be glad that the tablecloth was finally being used.  I know I will definitely enjoy seeing it on a regular basis instead of once every 25 years or so.


P.S.  Here's another long ago item that was surfaced in the Marie-Kondo-purge....

My wedding  dress!  Yikes!  I couldn't resist...I had to see if I could still get into it.  The slips that filled out the skirt are long gone...


YES!  And I could still breath with it zipped up!  

Yes, I made it.  My husband loves to tell the story about how my mother and I spent a whole afternoon pinning in the hem and as I was gingerly taking it off, I dropped it to the floor without realizing that the cat had hawked up a hair ball exactly where the center front panel landed!  😩😩😀😱
I remade the skirt, removing the offending panel, and spent another long afternoon pinning.  If you notice the dark stain in the picture, it is not from the fur ball incident as it has come to be known, but from a glass of champagne that my husband dropped in my lap in the car on the way to our reception! 😲 Fortunately it didn't darken until many years later.

Here's the dress on the actual day...


OK, no wisecracks about the hairdo!  
Remember that my mother and I spent two days hemming that dang skirt.  It was perfect.  It was a perfect 1/8 inch off the floor!  It wasn't until the pictures came back that we realized that the church had put new carpet in a few weeks before our wedding and my shoes sank into the fluffy new pile causing the perfect hem to bunch up!  The best laid plans....

I'm sure there will be many more memory lane moments as we make our way through the cupboards.  Maybe hanging onto a few things isn't such a terrible idea...


7.03.2020

Knitting the Time Away

I have been sewing...really...trust me....I just haven't been finishing much. 😬

If you pop over to the Threads Magazine site you will find some of the things that I have been working on over the last few weeks.  I usually have several projects going so I can post some with Threads and some here and have plenty to go around.  But I have been a bit stuck lately.  It happens from time to time and I always seem to get back into my sewing room.  I guess it surprises me this time because I thought having lots of 'isolation' time and lots of stashed fabric would be the proverbial dream come true, but the days seem to fill up with yard work and figuring out what to cook (I don't think I have ever cooked so many days in a row...ever!!!!  Take out pizza, please!) and knowing that I will be needing a different kind of wardrobe going forward have all made for a sewing slow down.  As the ozone days happen and the bug count goes up I might find my way into the sewing room pretty soon.  I know I can't force the issue, just go with the sewing, or no sewing flow.

One project I did finish this past week was a knitting project.  I have been having some kind of knitting going during this time since TV evenings have been much more frequent.  As with a lot of my knitting, this one was a lot of trial and error (frogging) and experimenting to get to the final garment.  But I am pretty pleased with it and glad that it is off the needles.  By the time I finished it it felt like I had knitted at least two sweaters!

The yarn is a very loosely twisted, almost no twist, 6 strands of exceptionally soft cotton.  I kept sticking my needle between the strands...annoying!  My idea was to have little to no sewing to do.  I wanted to create the shape by holding and picking up stitches rather than seaming.  The cotton is fairly heavy and I thought seams would get quite bulky.

I cast on at the hem and worked to the armholes and then split the work into fronts and back.


Next I did a 3 needle bind off to create the shoulder seams and picked up around the armholes.  The sleeves were knit in the round with a series of decreases to get to the smaller wrist measurement.


Finally, I picked up stitches along the neckband.


I have no idea if this is the "real" way to knit a sweater, but it kind of worked out.  I learned to make buttonholes.   Don't look too closely, I'm not sure buttholes in seed stitch is the best first project, but there you go.  I also wet blocked the sweater since it was already 3D when I took it off the needles.  It took two days to dry!

All in all I am happy with the outcome.  I have not done much other than square knitting, so shaping and short rows are all experiments for me.   It is a good thing that I had really expert help....


6.24.2020

Funny Pants and a Sunny Shirt

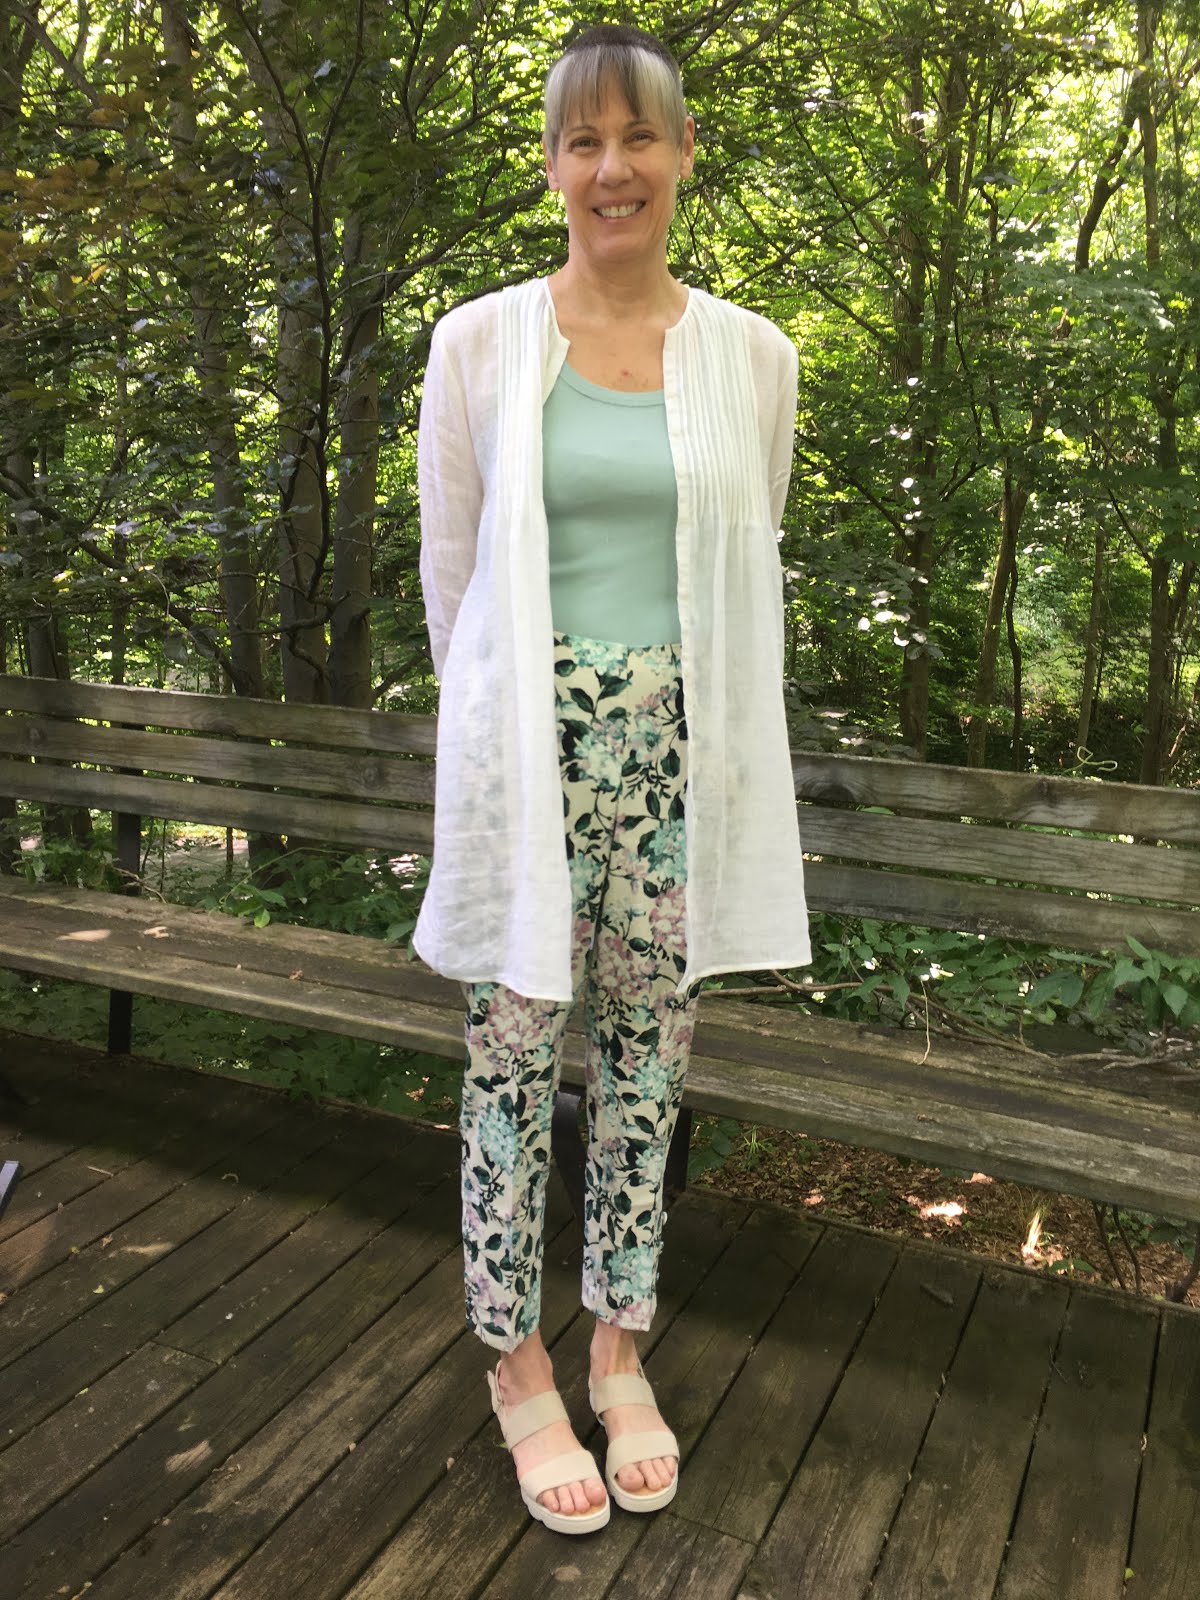
All spring I have been thinking about a pair of JJill pants that I saw in their catalog.  I don't know why they have stayed on my mind.  They are nothing like I would usually pick, but something about the print or the colors....I'm not sure...maybe they just have gotten stuck in my head because I want to think about anything other than virus and violence.  Whatever the reason, I just haven't been able to shake 'em.  So the other day when I got an "update" from JJill in my email, they were on sale!  Lucky me!  I figured this was a sign.  I ordered them up. (along with some really darling sandalsπŸ˜‰)

When they arrived I was so pleased.  They fit...pretty much....the fabric and print were lovely...they might border on "too cute for their own good" but they make me happy.  I was surprised to find a tank top that I had gotten last summer when I was visiting Portland, OR that was perfect with the pants.  I love it when a plan comes together.  Even when it wasn't a plan.

I did decide to nip in the waist of the pants just a smidge.  It was really easy to do since the back of the waist is elastic.  I opened the casing and took a tuck in the elastic and stitched it back in place.  A 5 minute fix.


While I was awaiting the arrival of my spiffy (that's a word my Grandma used for just such occasions) new pants...which took forever to get here!  I kept myself busy with another thing that has been on my mind forever.  A new sun shirt!


I have been wearing this shirt that I got on sale at Banana Republic eons ago as a cover up at the beach.  It is a very lightweight cotton voile/gauze with a bit of a crinkle in it.  The weight is perfect for hot sunny days when I need to keep the sun off my shoulders.  I have tried other solutions, even made a couple of failed options, but keep dragging this shirt along.  It's getting to the point that it shouldn't be allowed out of the house, but I can't give it up.  I found a gorgeous gauzy linen while I was rearranging in my stash that was the weight I was looking for.  New sun shirt here we go!

Now I say the old sun shirt was perfect, but that's not quite true.  The neckline is a bit low and doesn't keep the sun off my chest, and it could be a titch longer if I am being super critical.  With those changes in mind I forged ahead...

My plan was to use the Tabula Rasa pattern from Fit for Art.  I love this pattern for lots of reasons, but in this case it is the way the sleeves and shoulders are designed that I wanted.  They are roomy without being 'baggy.'  Since I knew I was going to wear this shirt over other clothes, I wanted to make sure it would have the room I needed and also be easy to put on and take off.
You can see the Tabula Rasa and all the other great patterns from Fit for Art here.


I started by making the pleats.  The very tiny 1/8 inch pintucky pleats.  My fabric was perfect for the cover up but not ideal for making pleats.  After taking out several tries I decided I would pull a thread the length of the pleat to mark the fold.  I could keep the folds straight and when the pleats are sewn in the pulled threads don't show at all.  My edge stitch foot was also a lifesaver.


Because the fabric was soooooo loosely woven I wanted to avoid too many seams.  I decided to use the selvedges as the front button placket.  I measured the pleat placement in from the selvedge on each side of my fabric and made the pleats intending to cut the pattern out once they were in place.  I made another set of pleats in the center of the fabric to give myself the maximum space to cut the back of the shirt.  

When I folded the pleated fabric and placed my pattern pieces....BINGO!!!  They fit exactly.  I must have re-done the layout 7 times...yep...it was a perfect fit!  No side seams needed!  I only had to cut out the armholes.  The way the pattern is put together WITH a side seam makes it really easy to do french seams.  However, with no side seams...well let's just say that I'm glad the seams are in my armpits where nobody will see them.  ( I have edited out the bad words and hand wringing)

I added as much length as I could get out of my fabric and also made the sleeves a bit too long so they will cover the tops of my hands if I want and roll neatly out of the way when I don't need the coverage.  I made a small bias bound edge at the neck, buttons and buttonholes, Bob's your Uncle, I have a new sun shirt!  And doesn't it look great with my new flowery pants?! (also note darling sandals, score!)


After literally years of dreaming about this shirt, here it is!  Yeah!  Let the sun shine in!


6.19.2020

Square and Muddy: Lessons from MeMadeMay

Another May is in the books!  Wow, what a May! So much unknown, so much turmoil.  Spring of 2020 is definitely going to be on our minds and in the history books.   I have a teacher friend who says he wants to be around in 15 years to see how this time period is taught in school.  An interesting thing to consider, eh?  I have another friend who says, "Never let a good crisis go to waste!"  Another interesting thought.  My May idea was not so lofty or profound, but I did participate this year in the MeMadeMay Challenge.  (If you are wondering, like I was, about how this became a 'thing,' check out the origin here)
I 'sorta' participated last year (you can read about my May 2019 here), just to see if I could do it, but I didn't have a way to really join in and share my 'makes' as they have come to be known.  This May I actually created an Instagram page/site/thingy? so I could add a picture each day.  I challenged myself to wear at least one handmade item each day, it is quite interesting to see all the photos at a glance.  It really does reveal a lot about what I choose to wear of the things I have made.  Here's what I learned from my 2020 MeMadeMay Challenge....

The first thing I realized was that just getting into "real" clothes during lockdown was a challenge.  The urge to just put on the same sweatpants everyday had a huge amount of inertia behind it.  I was very glad for the challenge as a way to get me dressed everyday.  I noticed that being in something that I had picked intentionally helped me move into action of some sort, even if it was just getting out for a walk, or calling someone on the phone.  Also, knowing that I was going to take a picture of what I was wearing gave me more incentive to 'look presentable.'  It was subtle, but really did nudge me everyday to make the effort.

Here's a kind of breakdown of what I wore for the month:

Self designed patterns/garments:  19
Hand knit items:  15
Redos/refashions/upcycles: 4
Merchant and Mills: 4
Reversibles: 2 
Square Clothing...31!!!!!
Mud colors....31!!!!

Yep!  I'm definitely square!  And muddy!  If you don't believe me, I have the photographic proof!
(you can see these better on my Instagram thingy...beckysewsalot)


"Square and muddy" might be OK for describing a pig pen, but they are not the most attractive adjectives for a wardrobe.  However, it is not surprising that they are the ones that describe my closet.  I have been loving and choosing fabrics and garments in a very specific and narrow color range for quite a while now.  It has created a selection of clothing that is ultimately mix and matchable, and what might be surprising, is that I don't get tired of it.  I know that the colors suit me and it helps me feel confident in my choices.  What might be somewhat surprising is that I find restricting my color palette pushes me to be creative in other ways, such as distinctive details, or design lines.  

Another realization that has happened over the past two years is that May is cold!  Growing up in Michigan you would think that I would have known that.  But as I looked over both last year and this year's clothing choices, I was looking at wool and sweaters and long pants and alpaca and turtle necks...occasionally by day 29 or 30 a short sleeve might show up, but on the whole, May is cold.  I think we here in Michigan trick ourselves into thinking that May is spring just because we are so dang tired of winter! 

So those are a couple of aha's from the challenge, but here is the kick in the head to all of this....going forward, I will be living for a big chunk of each year in a very warm and very colorful place!  Seeing these pictures and imagining them in Key West made me realize that I am going to have to break myself free from the mud and the alpaca and get into a bit more color and linen if I am going to feel like I belong on the island!  Now that feels like a challenge!


6.04.2020

They Just Keep Coming

I may be sounding like a broken record, but I have another Merchant and Mills creation to share. 

Usually when I get home from a workshop I unpack and put everything away and promise to get back to it soon.  Of course, life happens and some time in the distant future I come across the samples or the half finished project and maybe I pick it up again.  It wasn't planned, duh, but as soon as I returned from my week in Rye we were asked to hunker down.  So, there I was with a pile of new patterns, a box full of luscious fabrics and all the time in world!  Shall we call it a bit of a silver lining?

It has been very nice to have the time to explore the Merchant and Mills portfolio.  I have been loving their design aesthetic and their silhouettes for awhile now and over the past several months I have tried several of the patterns.  Some I had already been working with and others were all new.  There was one jacket pattern that I wanted to give a try and decided to make it in something bright and springy. 

You may remember from the last post that I have been supporting our online fabric retailers...when I ordered the happy tropical print from Marcy Tilton's site, I just couldn't resist a piece of teal colored linen as well as a floral print rayon.  I wasn't sure from the website if they would actually go together, but when they arrived they were perfect.


Merchant and Mills Haremere Jacket here we go!

The pattern for the jacket I wanted to try is included in the "Workbook."  

There are a whole group of patterns that are part of the "All Season Wardrobe."  The pattern pieces are included along with wonderfully detailed instructions.  The Haremere is a jacket that gets its inspiration from menswear, but has some nicely done details that give it a softer, more feminine shape.  I was a bit nervous about the dropped shoulder since my shoulders are broad and I have learned that most patterns do not accommodate my generous shoulder proportions.  I did have to adjust the pattern, but ever so slightly, to get it to fit gracefully over my shoulders.  I was on a roll while I was working on it and completely forgot to take any in progress photos, so let's just say everything went swimmingly and here are some finished garment pics!

I had enough of the teal linen to make a pair of Closet Case Pietra Shorts (another pattern I have been wanting to try.)  Again, no progress shots....
And finally, I used a self drafted bias cut tank top for the rayon print.  

I am very pleased with all three pieces.  I may not wear them all together, but I think they will work with several other things I have in my closet.  Always a bonus!

It actually was raining when I took the pictures, the wellies and the umbrella are necessary, not just for the photos!


The inside has a lot of great tailoring details and I used a piece of tie silk for the lining and seam finishes.  The pattern does not call for Hong Kong seam finishing, but hey, when you have pink silk...


The shorts have great front pockets and the instructions for the elastic in the back waist are excellent.


I said I had enough for the shorts...let me correct that to, I had enough for the "outside" of the shorts!  I had to get a bit creative on the inside.


The seam across the bust of the top conceals a bust dart and the bias helps create enough stretch so that it fits close but doesn't need a zipper.  I  have a couple of these tops and love how easy they are to wear.


So far the Merchant and Mills patterns that I have tried have delivered.  It is so great when the idea in my head actually works out on the cutting table!  I still have a few more to try....