On my last several trips I have been 'auditioning' different luggage and carry-on options. How much do I really need? Can I get everything in a carry-on? If I take something out on the plane can I actually get it back into my bag? Can I pick it up if I pack it? Does it fit under the seat?
I like to think that I look like the chic, totally coordinated, organized traveler on the right.............................
However, I am afraid I may look more like this poor soul!
It is a conundrum. And there are so many different options!
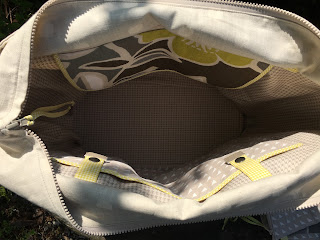
On my last trip I took a tote that I made last summer. I made it with the idea of using it to take sewing and knitting projects with me in the car or for workshops. It has tons of pockets on the outside and a big 'cargo' area on the inside. It works really well to keep my tools and projects organized and handy when I am away from my sewing room. Since I was on my way to a sewing retreat I packed it as my carry-on so I would have it when I got to the workshop. Light bulb!!!
I don't know why it never occurred to me before that it would make a great carry-on, I just thought of it as my 'workshop bag.' It was great as a carry-on! It fit really nicely under the seat in front of me, the outside pockets made it easy to get to my water bottle and snacks, I had room for a knitting project, and my sweater (I'm always cold on planes) and it looked fun as well!
It is a pattern that I have been 'honing' for some time. As you can see from the envelope it is an OLD pattern...it is in fact an out-of-print pattern. (I did see a current pattern that was similar, Butterick 5867, which is designed as part of a dog accessories series! It doesn't have the outside pocket panel, but I like the way the straps are designed!)
My OLD pattern Current Butterick 5867 pattern
Several "Trial Balloons" of my favorite tote
I have made this tote several times. Each time I have made slight revisions as I learn what I like and what isn't working. My latest version involved 7different fabrics, 2 kinds of zippers, upholstery tacks, 3 different kinds of interfacing, several broken needles, two full days in the sewing room, lots of 'engineering' time, and a pound of chocolate!
Here are some of the things I have added or changed over the years as I continue working the pattern:
- I like that the bottom is a separate piece so I can use a different fabric. I like to use something tough and water proof. (in this case vinyl) I have also added metal "feet" to the corners to protect the bottom a bit more. When I can't find the actual metal studs that are made for that purpose, I use decorative upholstery tacks with the ends bent over. They are bigger than the studs I have found and come in lots of colors.
- There are 6, count 'em, 6 pockets on the outside of the bag. On my recent trip I realized that I don't like to keep my wallet or my phone in these pockets, even though it would be really convenient, because they are open. So on my latest version I added a zipper to the front of one of the outside pockets. I still have the open pocket behind the zipper pocket which is a great place for boarding passes.
- The tote pattern doesn't have any inside pockets. On several versions I have added small organizing pockets for pencils, small loose 'stuff', you know, the things that usually find their way to the bottom of the bag! On the inside of my new bag I added a zipper pocket on one side and a padded pocket on the other side to hold an ipad or laptop computer.
- I added a small pocket on the inside of one of the outside corner pockets to keep my reading glasses or sunglasses handy. The outside pockets just happen to be the perfect size for my favorite water bottle!
- I padded the straps to make carrying more comfortable. I also discovered that the length of the straps allows me to carry the bag "back-pack-style" if I get to feeling lopsided!
- I turned the center pocket on one side into a slot that can be slipped over a roll-aboard bag for easy carrying. (My smarty pants son asked me if it fit? and I said, "of course it does!" It was just dumb luck that when he left and I tried it on my roll-aboard that it did fit, just! note to self, measure first!)


No comments:
Post a Comment