8.30.2019

An Overhaul for Overalls!

Here we are...the last Friday in August...the last week of a Month of Pants....

I have had such a good time 'getting to the bottom line' this month.  I have several new wardrobe additions that I think are going to get worn often.  I have some great ideas from Rhonda's posts that I am going to try. (I already have several more ideas for my PJ bottom pattern!)  And, I usually have a bit of an end of the summer lull in my creativity but these four challenges have given me a creative pick-me-up just in time for some fall sewing.


So, what is the challenge this week?  We are doing some renovations!  We started with a pair of pants and reimagined, refashioned, refurbished, retrofitted them into a different pair of pants, or whatever! 

When I proposed the idea back in July my thought was to go to the thrift store and get a pair of pants and have at it.  When it actually came time to do it, the thought of taking apart a stranger's old pants kind of gave me the willies.  I don't know why I hadn't thought about it before, but eewwww.  So I ended up in my own closet, and sure enough, there were several opportunities just waiting for me.  AND, I couldn't pick just one!

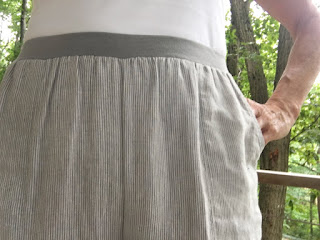
The first pants I pulled out are a pair that I got back in the spring.  They fit, I liked the fabric, but I never wore them.  They didn't come out of the closet once this summer.  I tried them on...again...and took a hard look.  I decided that it was the bulky waistband and tie that I didn't like.  That was an easy fix!  After the success of last week's knit waistband technique I just went right ahead and did it again.  I made this one a bit narrower so I wouldn't lose too much of my pocket openings.  I am so much happier with them in this renovated form.  They will definitely be in the rotation until the cooler weather sets in.


Original waistband and tie .....newly renovated knit waistband!

There was elastic in the original waistband that I encased in cotton jersey and reapplied to the new version...


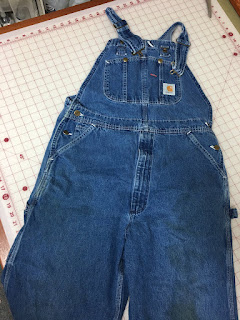
The second pair of pants that I pulled out were my old working-in-the-yard overalls.  I had gotten a new pair at the Farm and Garden a few weeks ago and was planning to put the old ones in the donation box.  Perfect timing...


My first thought was to make an overall skirt....I would cut the inseam open and overlap the seams like an old 70's hippy skirt...well...I think the jumpsuit in week two was more than enough of a romp down memory lane!


...a couple of years ago I had remade a pair of my son's jeans into a wine tote...hmmm....maybe a bag!
(You can read about my wine tote HERE.)

Y'all know I love a bag project!!!  This one was dead easy!  I cut off the legs and stitched across the bottom and...BAG!


All of the pockets are still useable and there is plenty of room in the main section.  I think it will make a great beach tote...or maybe a knitting bag....we'll see....

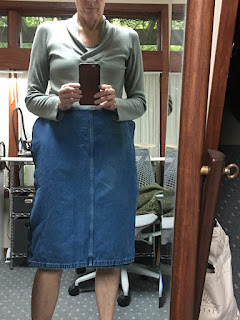
I was pretty happy with my redos and was cleaning up my sewing table, when....I held up the legs of my overalls and dangit if they didn't look like a skirt!


Well I couldn't let that go!  So I now have a really cute jean skirt to go with my really cute jean bag!


The center front and back seams are actually the outside leg seams of my overalls.  I put a zipper in one side and used a piece of twill tape to make a waist tie.  So I ended up with a skirt after all.


And this is all that is left of my old overalls!


Check out Rhonda's renovations HERE!

Thanks again Rhonda for suggesting a month of pants.  It has been sew much fun!  


8.28.2019

"You've Been on My Mind"

I have to admit that when Rhonda suggested a whole month of pants I was thinking how many different ways can I make pants!?  But I now have more ideas than I have weeks!!!!  It reminds me that where you put your attention, energy flows.  I think we usually stop at the first (maybe second) idea and we never really get to the more nuanced or creative ones.  Focusing on pants for a month and coming up with 4 different takes is pushing my brain into those subtler ideas.  Thank you Rhonda!

I got a bit excited about our August plan and jumped the gun with week one!  So now I am a week ahead of Rhonda and decided to just go with it...I'm not sure if we'll end up in the same place, but I am enjoying the great bottoms and the nice additions to my pant wardrobe.

This week's edition of "Getting to the Bottom Line" is about things that have been on our minds but never seem to get the front row seat. (yes, the pun was intended!)  Maybe we have a piece of fabric that keeps getting pushed to the back, or a technique that we have seen or read about that we haven't tried yet,  maybe there is a pattern that has been on the pile for a while now....something that has been tickling our fancy but we haven't actually gotten around to doing.  The time has arrived!

My "you've been on my mind" project started with a skirt that I made earlier this summer.  I wanted a skirt with a flat waistband.  I had a top that I wanted to wear for my niece's wedding but the skirts I had all had waistbands that 'poked' out and made the top bunch up and look awful.  I needed something that would fit close and be flat under the hem of the top.  I ended up making a gathered skirt attached to a knit 'yoga pant-ish' waistband.  It worked really well and was sooooo comfortable!  I thought about trying it on a pair of pants...and then got distracted and, didn't get to it.


(Ok, yes, it is a way to get a gratuitous photo of my handsome son into the blog!!!  😜)

So that was the first idea....as I thought about making the pants I remembered a piece of fabric that was left over from another project that I have really wanted to make into pants, but I only had a short length of it.  It is a piece of Eileen Fisher birds eye woven linen that I had been hoarding and waiting for the right idea.  I thought with the knit waistband a short length of fabric would probably work.  

Here's the dress that I made using the Eileen fabric for the lower portion....you can read about the dress HERE


OK...waistband, check, left over fabric, check...

I found a piece of knit that was a color match, but it was a bit too light weight and didn't have the stretch and recovery that would hold up to the weight of the linen....hmmmmm....technique idea!!!!
A sewing buddy had shared a great idea for making yoga pants.  To get the extra stretch into the waistband she added an 'interfacing' of power net...the stuff that you use to line swim suits!  It was just the thing.  It added the stretch without adding much weight to the waistband.


...and finally...when I read Rhonda's post about her favorite PJ bottoms pattern...perfect!  I pulled out my PJ pattern.  It has a fold-over casing at the top so I could cut it off straight across and add my knit band.  I laid it out on the linen using every bit of length I could get!  Here's what I had after I cut out the pattern pieces...


I really wanted pockets....

I used the "crotch" cut outs and inserted a piece into the center (it had to be on the cross grain!) to get enough to make patch pockets.  I think they are kind of nifty.


I ended up putting a facing at the hems to eke out every bit of length I could get and they are still just above my ankles, which I am kind of liking.  The 'flood pants' trauma from high school is starting to recede a bit and making pants that are 'too short' doesn't cause quite as much consternation! 


I've been hanging out at the lake this week, so I don't have my crack photographer to help me...it's selfie time. 😉 


These pants are super comfortable!  and so easy to make!  (The pockets were the toughest part!)

I am very happy with my "Eileen Fisher" pants...what's not to like...PJ bottoms with a yoga waistband?!   It was worth holding out for the right project!


Be sure to check out 'what's been on Rhonda's mind' HERE...

What's been on your mind?  Maybe now's the time to try it!

The fourth and final installment of Pants Month will get our creativity going again next week when we try some 're-imagining.'  


8.18.2019

Jumping In!

Rhonda from Rhonda's Creative Life and I are exploring pants this August.  Last week we shared our favorite pants patterns.  It is always fun to see what inspires other sewists.  Rhonda made a wonderful pant/skirt creation that is so her.  She has a dramatic flare that often shows up in amazing sleeves and unique collars.  That same flare was on display in her full legged, border print pants with a clever skirt overlay.  Just lovely!  Even though we scratch our heads and whine about fitting, we sewing folks are so fortunate to be able to imagine something and then go right ahead and make it!  Yeah us!

This week Rhonda and I are going to be starting with the same fabric.  Not only do Rhonda and I have very different body types, we also have different color palettes.  Rhonda looks lovely in any shade of blue!  She also loves a great contrast!  My color choices, on the other hand, tend toward 'mud' colors and monochromatic.  Browns and greys, neutral linen shades....maybe you have noticed? So picking out a fabric that we would both enjoy working with and wearing was a bit of a challenge.

 Back in July I was trolling around in my local fabric haunt and I ran into the softest, yummiest, cotton Hawaiian fabric.  The quality of the cotton and the hand of the fabric remind me a lot of a Liberty of London cotton lawn. Finely woven with a bit of a sheen.  The print has both blues (for Rhonda) and greys (for me) with a touch of lavender thrown in for fun.  I thought Rhonda would love it as much as I do and snapped up 6 yards!  That was easier than I thought!  But then....what to do with it?!


Now that I am considered 'vintage'...or at least the clothes that I wore in high school are considered vintage...it is hard to get my head around wearing those styles AGAIN!  But I have been seeing jumpsuits everywhere!  Yeah, I know...can I really make a jumpsuit?!  Well, apparently I can.


I did start with a pattern but about the only thing left of the original design is the v-neckline!  The original pattern was basically two front pieces and two back pieces with a zipper up the back to get in and out of it.
OK, it's not likely that I would be able to get to a back zipper in an 'emergency' so that had to go right off.  No zipper meant that I would need to make the top neck opening big enough to wiggle my hips and shoulders through.  I thought I had it right but when I tried to get it on...Nope...That's how the little gathered up elastic piece in the back neckline came to be.  It reminds me of the back of the 'sunsuits' I used to wear as a kid!


The original also had in seam pockets.  I definitely wanted pockets.  I thought about the side seam pockets, but I never really like them.  They always seem to be too far back to get my hands into comfortably.  To get the pockets around to the front of my suit I cut the front pieces along the waistline and added slant pockets.


The original did not have elastic at the waist, it just suggested wearing a belt.  That I liked, but I knew that every time I wiggled in and out of my jumpsuit I would be adjusting the gathers at the waist.  Nah!  I added a casing and elastic to keep the gathers in the same place.


I looked for a belt but was not inspired by anything that I found so decided to make one.  I wanted a 70's type belt with the two rings.  I found some at a local quilt shop but they were $13!!!!  Seemed a bit steep so I wandered around in the hardware store and found some rings...I have no idea what they are actually designed for, but they were only $2.69 and made a really great belt buckle!


I also made a big long self-fabric tie that I think makes the jumpsuit feel a little dressier.


AND...I actually hemmed the thing 'too short!'  Yep,  I'm gonna see how that feels.  Meany, highwater pants teasers take that!!!! 😱 Sorry, a bit of a high school flashback!

I haven't seen what direction Rhonda's imagination took with the Hawaiian print, but knowing Rhonda, it will be fabulous!  Check it out HERE.

Next week we'll be "Getting to the Bottom Line" again with a new challenge in the month of pants.


8.02.2019

Going with the Flo!

I'm so excited!
Rhonda (Rhonda's Creative Life) and I decided to do another "sew together."  If you remember the last one got interrupted by Rhonda's icy tumble in February, which resulted in a broken wrist!  Ouch!  She is all healed up and ready for a month of sewing.

Rhonda suggested that this August we get to the bottom line and do four weeks of pants.  That's right...pants.  I have been sewing for, well, a really long time and pants are still the toughest garment for me to fit.  Just thinking about crotch curves fills me with anxiety...cue the horror movie music!  But we have some fun things planned so maybe it won't be too scary.

Here we go...week one:  "Getting to the Bottom Line"

This week is about our favorite pants pattern.  The one that we have been tweaking and fussing with forever!  I would like to say that my particular fitting opportunity with pants is something that has happened as I've gotten older, but if I am honest, I have always had a pretty flat butt.  Yep, I have never really filled out the rear view.

The problem usually shows up as a whole lot of extra fabric at the top of my leg...where a butt is supposed to be...figuring out how to remove the extra folds of fabric has been an ongoing challenge.  But, last year I read a blog post and the writer was raving about a Style Arc pants pattern, The Barb Pant.  I decided to check it out.  I was just about to pop it into my shopping cart when another pattern caught my eye.  It was the pattern that I have been searching for...cue the heavenly music!  Honest to goodness it is called, "Flat Bottom Flo."  Into the cart it went.

The Barb Pant

I haven't tried it...I got distracted by Flo...but the reviews I have seen really seem to be positive for this one.  If you have a butt, which I don't, this might be worth a gander.

I have tried several other Style Arc patterns and have found them to be consistently good.  The instructions are straight forward and they use some clever construction techniques that turn out a very professional looking garment.


Here's another one I should probably try...The Becky Yoga Pant! 😉

(It is so easy to get distracted on the Style Arc website.)


Now meet Flat Bottom Flo. 😇

From the illustration she might not seem all that different from other pants patterns out there.  I have to admit my skepticism when I ordered it.  How many pants pattern rabbit holes have I been down! Here I go again!  But, oh, did Flo deliver!

I decided to try it straight out of the package, no changing, no monkeying around, straight up Flat Bottom Flo.  She rocked my world!  I have never had a pair of pants fit so well on the first round.  I had to sit down for awhile and let it sink in... could it be that I had finally found THE ONE?

While the first go was rather breath taking, there were a few of the usual suspects that needed to be dealt with.

One of the things that I figured out after many many miserable pairs of pants, was an alteration that changes the grain line of the legs.  If your knees bow out or knock together you may have experienced this issue.  It shows up as diagonal folds running across the front of the pants making them appear to twist around the knees and shins.  I tried all kinds of things to correct this and finally found this simple change in my Singer Sewing Book: Pants That Fit.


In my case, I needed to adjust for knocking knees.   Essentially the idea is to move the center of the pant leg to align with the center of my leg, which means I need to move it about 1/2 inch toward the inseam.  Once the lower leg of the pant lines up with the center of the ankle, a new grain line is drawn that corrects the hang of the pants and, voila! no irritating folds across the legs.  

This little 'personal problem' was not something that Flo dealt with, but having done it a million times, it was a quick fix.

So what, you may ask, is the secret that makes Flat Bottom Flo my new favorite pattern?  WELL...
I'm not sure I completely understand what is different, but here's my best guess.
(Warning:  you may want to skip to the end if you have a low tolerance for lyrical waxing about crotch curves!)

1.  The shape of the dreaded crotch curve!!!

Most pants patterns angle up from the crotch seam to the center back.  This is a great idea because it puts a bit of bias stretch across the fullest part of the bum and makes a nice comfy, sittable pair of pants.  But as I mentioned (did I mention?) that I have no bum to accommodate!  So, for me this arrangement ends up with droopy extra fabric across my backside.  Unattractive and vexing!  Flo has figured this out.  Basically there is no 'curve' involved, just straight up the back.  I had actually figured this out, but altering pants that already have an angled crotch curve usually requires not only changing the angle but then dealing with the extra inches that end up around the waist.  It sort of just moves the issue to another location!  Excellent work Flo!

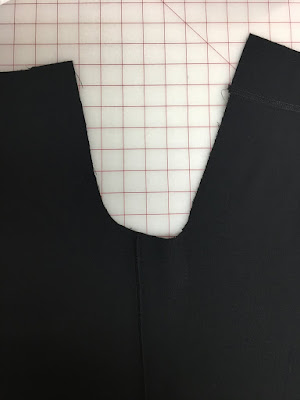
(I know, I used black!  Hope you can get the idea anyway.)

The back crotch seam is basically a straight line.  Or as I like to refer to it, my "L" shaped crotch curve.

You might also notice that the seam angles down from the front to the back.  I don't know that this is particular to 'flat bottoms' or done to recognize the effects of gravity on our lovely tushies!  Anyway, Flo figured that one out, too.


2.  "Can I please just put a fisheye dart under my butt?"

Before I met Flo, I would finish a pair of pants and grab an inch, sometimes more, of fabric under my butt and say lots of bad words.  If I had been willing to live with a silly looking dart going horizontally across the top of my pant leg, I would have solved this problem years ago!   Well, leave it to Flo to think of it!  The back of the pattern is in two pieces, the main leg and a yoke.  This cleverly conceals the 'dart' so no one is the wiser, effectively pulling the #!%^*** folds of fabric up and out of the picture.  Well done Flo!


3.  "Does this pattern make my butt look big?"

One of the first things I noticed about the Flo pattern pieces was how different they were in the proportions of the front to the back from other patterns I have worked with.  There is WAY more back than front, which seems a bit odd if the problem we're dealing with is 'no butt.'  I have to admit that this detail is one that I have not quite figured out.  My best guess to date is that by pulling the side seam toward the front the hip curve that is usually built into the side seam, is eliminated, along with some of the extra fabric.  (If anyone else has a theory about this, and is willing to wander around in the weeds of pants fitting with me, I'm all ears!)  For whatever reason, it works.  Thanks Flo!

Check out the difference between the front of the pants and the back!!!  Whoa, can that be right?


...and finally...4.  Flo is designed to work with fabrics that have a bit of stretch.  She doesn't go all the way to 'negative ease' territory, but the close fit does allow some 'smoothing' to happen.

So there you have it...my way-too-much-detail analysis of my favorite pant pattern.

For this iteration I chose a woven stretch with good body and a fun houndstooth pattern.


If you have ever worked with stretch woven fabric before, you might have noticed that the stretchiest direction is often with the grain.  In this case there was quite a bit of give along the grain of the piece and very little in the cross grain.  This meant that I needed to put the pattern pieces on the cross grain to get the stretch going around my body.  (this always feels a bit odd)

I'd like to say that I cut these out and serged 'em up and walked out the door with not a single glitch, but Flo and I haven't gotten to that point in our relationship yet.  (or maybe I just can't imagine making a pair of pants without trimming and restitching the crotch curve 7 times!)  These are as close to 'one and done' as I have ever accomplished.  I timed myself and it was an hour and a half from flat folded fabric to pants (sans hems).  And that included just one small crotch curve tweak.  It is very difficult to adjust for the give in any particular fabric, so I chalk it up to that! 

It turns out that making a pair of black pants is much easier than photographing a pair of black pants.  The black and white versions are marginally better...
They are still sans hem.  I haven't decided what length to make them.  Having grown up in the era of being teased for having 'highwater' pants (given my height and leg length, I really had no choice!) it is still really hard to make pants too short on purpose.  I know it is fashionable, but....still thinking on it.


My pick for favorite pants pattern ever...I'm going with the Flo...Style Arc's Flat Bottom Flo.

Check out Rhonda's pick HERE
We'll be back next week with the next installment of "Getting to the Bottom Line!"